1) set ISO ke paling rendah ISO 100/200
2) set White balance ke Tungsten
3) set shutter speed ke paling slow
4) set appeture ke paling kecil F16/F18
5) set shutter timer ke 10 sec.
6) pakai nutrel Dinsity (ND)
One of the reasons enthusiasts purchase SLR digital cameras, is to take night photographs in and around the city without them resulting in blurred or shaky images. However, as you'll soon find out, it's not as easy as setting your digital camera to automatic and shooting the image. Listed below are tips that will help you take city landscape photographs after dark.


Mackay Harbour Marina Australia
|
Sydney Australia
|
A frequently asked question beginners often ask is, where should they focus for night shots. Personally, I get better results if I focus on a far object in the distance. This should ensure your camera automatically sets the aperture to capture the whole scene in focus and not just closer objects.
Using your DSLR camera in fully manual mode (M on the top dial), isn't as hard as it first seems. Whether you own a Canon, Nikon, or any other SLR camera brand, using manual mode works basically the same.
Example of photograph taken in fully manual settings
|


 down while turning the rotator to the correct exposure. This way it will be the aperture that is changed and not the shutter speed.
One of the most important steps for taking photographs in manual (M mode), is understanding how to achieve a good exposure.
while turning the rotating  dial until the aperture is the lowest f number it can go. You will be able to see this on the back LCD display. For example:
 until that exposure line is set directly in the middle (on 0).
Setting the correct white balance in your camera, is important to ensure the objects that are white, are actually displayed white within the photograph. As you can see by the interactive example below, white balance also effects other colors as well. If your camera's automatic white balance setting doesn't get the color 'white' correct, it won't render the other colors correctly either.
Click within the square below to start the demonstration. Then click each of the four white balance settings to see how color is effected by this setting.
|
Just about every photographer at one stage or another, has taken a photograph that contained a blueish tinge. The blueish tinge is normally a result of using an incorrect white balance. For example, the first image below has a blueish tinge, where as the second shot displays a more natural coloring.

Setting an incorrect white balance, can also result in unsightly reds, yellow or green tinges as well, depending on the situation.
Not always. While it's true many improvements have been made in todays digital camera's, they still often get white balance settings wrong in certain lighting conditions. If you take your images in RAW format (highly recommended) then sure, go ahead and use auto white balance. If the camera gets it wrong, you can always change this setting later on in your RAW editor.
For Canon users, the camera's white balance setting can be found on the back panel next to the LCD screen (on Canon 400D). It can be recognised by the letters WB, as demonstrated in the image below. There can be slight differences between models, so if you can't see the letters WB, then check with your camera's manual. Press the WB button and you'll be given a list of the following options: auto, daylight, shade, cloudy, tungsten light, white fluorescent light, flash and custom.
For Nikon users, press the menu button on the back near the LCD screen, and navigate your way to the 'Shooting Menu'. From there, you'll be able to choose 'White Balance'. Once you're in the white balance screen you'll have several options including: auto, incandescent, tungsten, fluorescent, direct sunlight, flash, cloudy, shade and preset.
Note: If you have the camera set on fully automatic, you won't be able to choose a white balance setting.
Note once again, settings differ between brands and models. Therefore don't worry if you have a few of them missing from your menu bar.
When to use Auto white balance: In auto, the camera guesses what white balance to use depending on the available light. In 95% of the time, the guess results in a nicely colored photograph. This is a perfect setting for times when you're unsure what white balance to choose. It's also a good idea to keep the camera on Auto white balance if you shoot in RAW format (recommended).
Daylight (Canon) and Direct Sunlight (Nikon): This is a good setting for direct sunlight. For example, a beach landscape mid morning where you're not shooting into shade.
When to use Shade white balance: Use shade white balance in shady area's or sunset shots. It will help give a warmer color to your shots.
When to use Cloudy: This is a good setting for cloudy days. It's also quite effective for shady area's as well. I've found there is a fine line between shade and cloudy white balance settings.
When to use Tungsten white balance: This is one of the most extreme balance settings of them all and should only be used with tungsten light bulbs. Or at times where you purposefully want a blue tinge to your images.
When to use fluorescent: This setting will help make inside flourescent house lighting, look a bit better than the yellowy orange color you usually see.
Flash white balance: Flash white balance is used mostly for studio work.
Custom (Canon) and Preset (Nikon) white balance settings: Use these ones with a white or grey card that you can pick up cheaply from any camera store, for perfect white balanceMany beginners often find their photographs are either underexposed (too dark) or overexposed (too light or white). However, there is a way to manually change the exposure to compensate for them being darker or lighter. Getting the correct exposure balance isn't as hard as it first seems, once you learn a few simple skills from the tips listed below.
On both Nikon and Canon digital SLR camera's, the exposure compensation button looks like a plus and minus sign (+/-). On a Nikon D40, this is situated near the shutter button. For Canon 400D it is found upper right to the LCD screen on the back of the camera.
Example of exposure compensation button:
Whenever you take a photograph in or around nature, it's useful to expose on any part of the scene that is green, then underexpose it by two thirds.
For example, for the photograph below, the exposure was taken from the green leaves to the left of the flowers. I then underexposed the shot by 2/3, refocused on the flower and took the shot. As the camera was set on manual, the shutter speed (exposure) stayed as it was when exposed on the green leaves. Usually when you refocus on the subject you want to take a photo of, the camera will tell you the exposure is wrong. Ignore this and take the shot anyway. In most cases, it will result in a nicely exposed, detailed photograph.
If you're not sure what I am referring to by 'setting the exposure', you can find a good article on this at: Advantages of manual settings.
Note, this exposure tip will also work when you have your camera set on shutter priority. However, it won't work for automatic modes (such as landscape, portrait) or aperture priority, as the camera then sets the shutter speed for you.
Exposing Flower Gardens
|
Exposure tip for black subjects like birds
|
Another time this exposure tip was useful, was during an outside photo shoot of my son. The first shot I'd taken was exposed on my son's face. Looking back on the LCD screen, I'd found there was a dark shadow over one side of his face. The shot was taken again, this time exposing (-2/3) on the green grass next to him. This helped to eliminate the shadow on his face.
Related Articles:
What is the difference between macro, micro and closeup photography?
There is often much confusion amongst new photographers over the terms macro, micro and close up photography and how they differ. For starters, macro and micro usually refers to the same thing, in that Nikon names their range of 'macro lenses' with the word 'micro'. Canon on the other hand, calls them macro lenses.
For example, Nikons top macro lens is called AF-S VR Micro-Nikkor 105mm f/2.8G IF-ED lens. Notice the term micro in that name.
Now for comparisons sake, Canon's top macro lens is called a Canon EF 100mm f/2.8 macro lens. This time, instead of seeing the term micro, you'll notice the term macro within the lens name.
What does macro and micro refer to when it comes to photography?
The word macro means big, whereas the word micro mean small. So how is it that these two terms related?
If the subject you are photographing is small and you want to make it look big, you end up with a "macro" view of a "micro" subject.
What is macro (micro) photography?
Macro photography is that which is taken with a dedicated macro lens. A real macro lens has the capability of achieving in the least a 1:1 magnification. Just because a camera has the word macro written on it, doesn't make it a true macro lens. Both the Nikon and Canon lenses mentioned above, are considered real macro lenses. If you're not sure how to recognise a real macro lens, you may find an earlier article useful called, What is a real macro lens.
What is close up photography?
Close up photography, is the act of photographing objects such as flowers or insects in close range so the subject you are photographing fills the frame. In other words, it's the act of photographing subjects close up. This is easily achievable with any lens, even a 300mm telephoto lens.
Macro photography is in essence close up photography as well. However, close up photography is not always considered as true macro photography. For example, if you have a lens that is NOT considered a real macro lens, yet offers a macro setting (as many do nowadays), this is usually refered to as being close up photography, and not true macro.
How to recognise the difference between macro and close up photography?
Capturing the finest detail, is one of the main differences between macro / micro photography and close up photography.
Macro lenses are expensive for a reason. That being, a true macro lens allows the photographer to capture finer detail than would otherwise have been seen. For example, the hairs on an insects face, or the pattern in its eye.
Take the two photographs below for example. The first image is a very good example of a close up photograph, taken with a Nikon telephoto lens. While the second photograph is a macro shot, allowing for bigger magnification and showing the finest detail.

Just because your camera lens has macro written on it, doesn't mean it is actually macro. Unfortunately manufacturers sometimes add this word to their lenses as a marketing ploy. Yes, it is true they can focus closer than an ordinary lens. However, don't expect them to get as close as a true macro.
Blue Dragonfly
|
A real macro lens has the capability of achieving in the least a 1:1 magnification. This should be written either on the lens or in the manual under specifications. Note: the aperture f stop is not the ratio we are talking about here. For example, the macro lens used to photograph the dragonfly above has an aperture of f2.8. However it also has a 1:1 magnification rating, making it a true macro lens.
Technically, this ratio is a measure of how large the subject appears on your camera's sensor. A lens with a magnification of 1:1 means the subject appears as life size on the sensor. A macro lens with a 2:1 ratio captures subjects twice as large as they appear in real life. On the other hand for a 1:2 lens, the subject appears on the sensor as half its actual size. Therefore a 1:2 lens is not considered a real macro lens.
Orange Dragonfly
|
Neutral Density filter are, in essence, just grey filters used to reduce the amount of light passing through the lens and hitting your camera’s sensor/film. So, in short, we use them in photography the same way you would wear sunglasses in real life!
They are said to be Neutral because they do not affect the colors in the resulting pictures, they filter out all colors equally.
Since ND filters will result in less light they can affect our exposure in 2 drastic ways
Building on the two scenarios we have just discussed ND filter can be very helpful in case you need

A slower shutter speed: A typical example is if you are shooting waterfalls!
We all like to capture that milky water effect but, to get it, you need somehow slow shutter speeds. Speeds that it is not possible to have on a sunny or even light overcast day. Here too ND filters are our friends eating up that extra light and allowing us to dial down to the speeds we want
I won’t go over the obvious million of situations when you do not want to use ND filers, however I want to pin point that ND filters should be used only when you want to equally reduce light passing through your lens in all the scene you are photographing. That is why, in the beginning of this post, I told you they should not be confused with ND Grad filters. ND filters are NOT useful if you are shooting scenes in which different objects are lit differently and you need to expose all of them correctly.
ND filters have “gradings” depending on the amount of light they cut. A higher grading means that the filter will filter more light allowing you wider apertures or slower shutter speeds.
They come, AFAIK, in 2 types of notations
 - Polarizing Filters -


Q1: What does a polarizing filter do?

A1: In order to answer this question, you'll first have to know something about
   light. Light can be regarded as a flow of particles (called photons), or as
   an electromagnetic wave. I'll try to stick to the wave theory. So, light
   can be regarded as a waveform, oscillating in an arbitrary direction
   perpendicular to its direction of motion. There will be waves oscillating
   up/down, oscillating left/right and all that's in between those two.
   A polaroid filter only allows to pass the component of the oscillation that
   is directed in the polarizing direction of the filter.
   So only the waves that are oscillating in the polarizing direction can pass
   the filter unattenuated. All other waves will attenuate according to the
   formula:

   Amplitude after polarizing = Amplitude before polarizing * cos (theta),

   where theta is the angle between the oscillating direction of the wave and
   the polarizing direction of the filter.
   The overall effect is blocking out half of the available light, and
   'directing' the other half.


Q2: What is the difference between a linear and a circular polarizer?

A2: The main points are:

   (1) If you use a standard linear polarizer with cameras that use auto-focus
       and/or auto-exposure, you may have problems.
       This filter may also cause trouble with manual cameras, if you're using
       TTL light measurement. A little dependent on the camera, your meter
       might go crazy.
       (It is not said you _will_ get problems, only that you might get them.)
- UV/Skylight Filters -


Q1: What does an UV or skylight filter do?

A1: Both of the filters filter out the UV light that can cause a blueish haze
  on your pictures, since normal film is not only sensitive to visible light,
  but also to UV.
  A skylight filter is also slightly coloured (pink or yellow), to give your
  pictures a 'warm' appearance (not so much blue).


Q2: What is the difference between a normal UV and a skylight filter?

A2: As mentioned above, the skylight filter is slightly coloured to give your
  pictures a 'warm' appearance.


Q3: In what situation do I use an UV filter?

A3: UV and skylight filters are useful when you are taking pictures in the
  mountains or at sea or any other place where there is a lot of UV light.
  It will filter out the blue haze that normally blurres the background of
  your picture. It is also very useful when taking pictures in the snow,
  since snow is a very good UV reflector.


Q4: Can I always leave the UV filter on the lens?

A4: About half of all the photographers keep an UV filter on their lens perma-
  nently, for it prevents your lens against dust, scratches and perhaps
  damage due to accidentally dropping the lens. A filter is much cheaper than
  a lens, so ruining your filter will not be as bad as ruining the front part
  of your lens.
  On the other hand, some photograpers (the other half) think it unneccesary
  to keep the filter on the lens, since everything between the original
  picture and your film, including filters, can cause blurrs or errors in the
  image, and that's one of the things we don't want to happen.
  It is just a matter of personal preference. I must admit I always have a
  filter on my lens, and I take it off only for cleaning.


Q5: What effect does an UV or skylight filter have on taking pictures?

A5: First of all, it will filter out most of the UV light. A skylight filter
  will also colour your pictures a little. Because the UV is filtered out,
  you may notice the sky in your pictures is not as deep blue as it used to
  be. This is because the UV component is now missing, resulting in another
  kind of blue on your pictures. Just try a few piCreatectures with and without
  filter and see what you like best.
  An UV or Skylight filter doesn't have any effect on the amount of visible
  light falling through the lens, so you won't have to correct for it.
I hope you will like and benefit from these flash tips for the perfect digital
photography!
You have to take full control of your digital camera's flash. Why? Because digital
cameras and their build-in software are pre-programmed and make a few assumptions..
For example:
There are sensors inside your camera that measure the percentage of illumination in
the scene at which your camera points. If the sensors measure low illumination then
your flash will fire. That is because your camera is pre-programmed with the assumption
that flash will improve the photograph in a low-illumination environment.
On the other hand in a high-illumination environment the flash will not fire because
the camera will assume it's not necessary. After all it's dark out there!
The issue with these assumptions is that there are certain situations when you want
an opposite result..
For example there are times when you want to shoot the perfect digital photography in
a low-illumination environemt without using the flash.. e.g. when you are in a dark
room with a candle burning and no other light sources.. If that's the case you need
to be really steady for the photograph to be sharp. You may want to use a tripod to
achieve better results. If you do it right you will have a perfect digital photography
with beautiful warm orange/red colours.
Remember that the straight light coming from the flash gives a cold commercial look to
your photographs. That could be ok in some cases but not in all cases.. You should
decide whether to use flash, not your camera.
But what happens when working in Bright Light, high-illumination environments?
Then, the flash will not fire! Of course that saves battery-power but what are the
results of your perfect digital photography? You definitely don't want to lose in quality
right?
Imagine when you want to take the perfect digital photography of a person wearing a hat
and the sun is overhead in the sky shining.. Then you will notice that the person's face
will be in dark shadow because of the hat! But even if there's no hat, you will usually
see shadows under the chin or under the person's eyes.. So what you should do is fill
those small shadows with light using your camera's flash!
Again, YOU should decide whether to use flash or not, and not your camera.. YOU should
take control of your camera's flash..
Today's digital cameras have five basic flash settings:
- Setting #1:
Automatic Flash: This is where your camera is pre-programmed to make assumptions
depending on the level of the environment illumination and use the flash accordingly.
- Setting#2:
Automatic Flash with Eye Reduction: Again, the camera uses its software to determine
when the flash will fire but there's also some type of red eye filters to reduce the red
eye effect.
You camera will probably automatically select, by default, one of the above two settings.
I recommend to never use the above settings if you're aiming for the perfect digital
photography.. And why is that you may ask..
As I said before YOU should be the one who decides whether to use flash or not.. And
furthermore the eye reduction filters will not always do a good work and will confuse
your subjects in most cases..
I recommend to make use of the following settings depending on the scene and the subject
you're trying to shoot..
- Setting #3:
Flash Always: With this setting enabled your flash will fire in all cases. You may want to
choose this setting when you want to fill small shadowed areas with light.
- Setting #4:
Flash Disabled: Your flash will not fire no matter how illuminated the environment or the
scene is.. Make use of this setting when you want to shoot in a low-illuminated environment
e.g. a dark room with a candle burning..
Just remember that in a low-illumination environment you have to be really steady in order
to shoot the perfect digital photography..
- Setting #5:
Slow Shutter Flash: This is a very underestimated setting and the least used.. If you choose
this setting your flash will fire ocassionally but the shutter will remain open for a longer
time than usual. This will allow you to capture the subject illuminated by the flash, but it
will also allow other lighting sources (like a candle's light) to record themselves.
This setting is perfect if there is high illumination on the background while infront of the
subject there's certain darkness. For example when you want to shoot a person in front of a
casino at night.
50mm f/1.8D AF (1978-today)
Nikon's least expensive lens is also among its sharpest. It has no distortion, focuses almost instantly, and it's Nikon's smallest and lightest lens.
It is among Nikon's fastest lenses, and covers film and the full FX frame.
Except that the D40, D40x and D60 can't autofocus with it (neither can the F3), there is no reason not to own one of these, unless you opt for the twice as expensive 50mm f/1.4 D.
All the earlier 50mm f/1.8 lenses are also all excellent, including the 50mm f/1.8 AF (non-D), 50mm f/1.8 Nikkor manual focus, and the 50mm f/1.8 Series E.
Nikon 18-55mm DX (2006-today) top
Even as a cheap, plastic lens, the 18-55mm is sharp, sharp, sharp, and focuses so close that few people will need a dedicated macro lens.
Included as a kit lens with Nikon's cheapest cameras, lenses this good and this cheap ask us what would happen if Nikon put some of this same mojo into its more expensive lenses.
It only covers DX digital; it can't cover film or FX.
18-200mm VR DX (2005-today) top
The 18-200mm VR is the freedom lens. It is the lens which let me get rid of the old fashioned "camera bag" photographers used to have to carry.
The 18-200mm VR replaces all the lenses we used to haul around. The only thing it doesn't do is replace an ultra-wide lens like the 12-24mm DX, or allow us to shoot sports in dim light like the 70-200mm VR. If you need anything longer, you'll get better photos by getting closer with the 18-200 VR than you will by using a longer lens like the 600mm VR.
Back in the days of DX cameras, the 18-200mm let me just go and shoot, and not have to carry other lenses or have to change them in a middle of a shoot.
135mm f/2 DC AF (1990 - today) top
Americans just don't get this lens, because Nikon messed up its name. The 135mm DC, or "Defocus Control," lens, is among Nikon's sharpest lenses ever. Defocus control doesn't mean soft focus, it means "background softness control." The DC feature is really Bokeh optimization.
The DC feature always keeps the subject ultra sharp, and allows the photographer to defocus just the background (or foreground) into the softest, smoothest, dreamiest and creamiest pastels ever.
The 135mm DC is Nikon's best hand-held portrait lens ever, as well as a killer-sharp 135mm lens for everything.
14-24mm f/2.8 AF-S (2007-today) top
The big, heavy 14-24mm f/2.8 AF-S just rewrote the book on ultra-wideangle lens performance. It raises the performance bar about 20 years ahead of every other ultra-wideangle SLR lens.
The 14-24mm is sharp, sharp, sharp, even wide open, and even in the corners.
It's so good that people are buying special adapters just to use them on Canon cameras!
The 14-24mm is excellent on amateur DX cameras like the D300, but doesn't really start pumping until you use it on film or a full-frame FX digital camera.
I've shot a lot of fixed 24mm, 20mm, 18mm, 17mm, 15mm and 14mm lenses in my days, and this zoom smokes them all. It lets me do things I never could, like jump into a dark, abandoned building without a tripod, shoot away at f/2.8 and high ISOs on a D3, and get out with excellent photos for which I don't need to make any excuses.
85mm f/1.4 AI-s (1981-2006) top
The optics of most of Nikon's earlier AI-s manual focus lenses have been exceeded in Nikon's newer AF lenses. This isn't the case here.
This manual focus lens outperforms its newer 85mm f/1.4 D autofocus sibling. In fact, its so good that even after the f/1.4 autofocus lens came out, for about the about the same price, Nikon kept making these for 10 more years!
It's sharper than the new AF lens, and it has much better bokeh than most other Nikon lenses.
If I'm photographing moving people and kids, of course I'll prefer the AF lens, but if I'm hugging a tripod, the King is still the King.
28mm f/1.4D AF (1994-2006) top
Nikon 28mm f/1.4 D AF. (blacked-out for national security purposes)
Nikon was once great. Nikon spent ten years perfecting this masterpiece, then discontinued it in 2006 from lack of market interest. Collectors finally figured it out, and they sell used for double what they sold for new.
This lens is special because its sharp, even in the corners, even wide-open at f/1.4. It is worlds better than today's 35mm f/1.4 (which is a manual focus lens made since 1969) or the manual focus 28mm f/2.
This lens allowed me to shoot things hand-held on ISO 50 film that otherwise I could not.
Because it has half the focal length of a 50mm lens, it can be hand-held at for exposure times twice as long. This lets me shoot hand-held in light twice as dim as with a 50m f/1.4 lens, or in the same light as a 50mm f/1 lens.
Unlike a 50mm lens, it has far more depth of field at the same f/stop. This additional depth of field also contributes to sharp hand-held photos at night. This 28mm lens at f/1.4 has enough depth of field for most things, while 50mm f/1.4 lenses have paper-thin depths of field
With digital it's no longer as needed, since digital allows high ISOs that film could not. The rise of digital contributed to lack of interest in buying these 28mm f/1.4 lenses new.
70-180mm f/4.5-5.6D Micro (1997-2004) top
Nikon ED 70-180mm f/4.5-5.6 D AF Micro.
Another lens so great that the market never figured it out, this is the only true zoom Micro (macro) lens ever made by Nikon. It also sells used for more than it sold for when new.
Unless you're photographing stamps, which makes you silly because you'll get better images sticking them in a scanner, shooting macro is a real pain having to move in and out all the time to frame products and chasing moving subjects like poisonous snakes. I know snake guys who pack heat to protect their 70-180mm lenses; these lenses are that good and irreplaceable.
All of my recent product shots, like half the shots on this page, are shot with this lens.
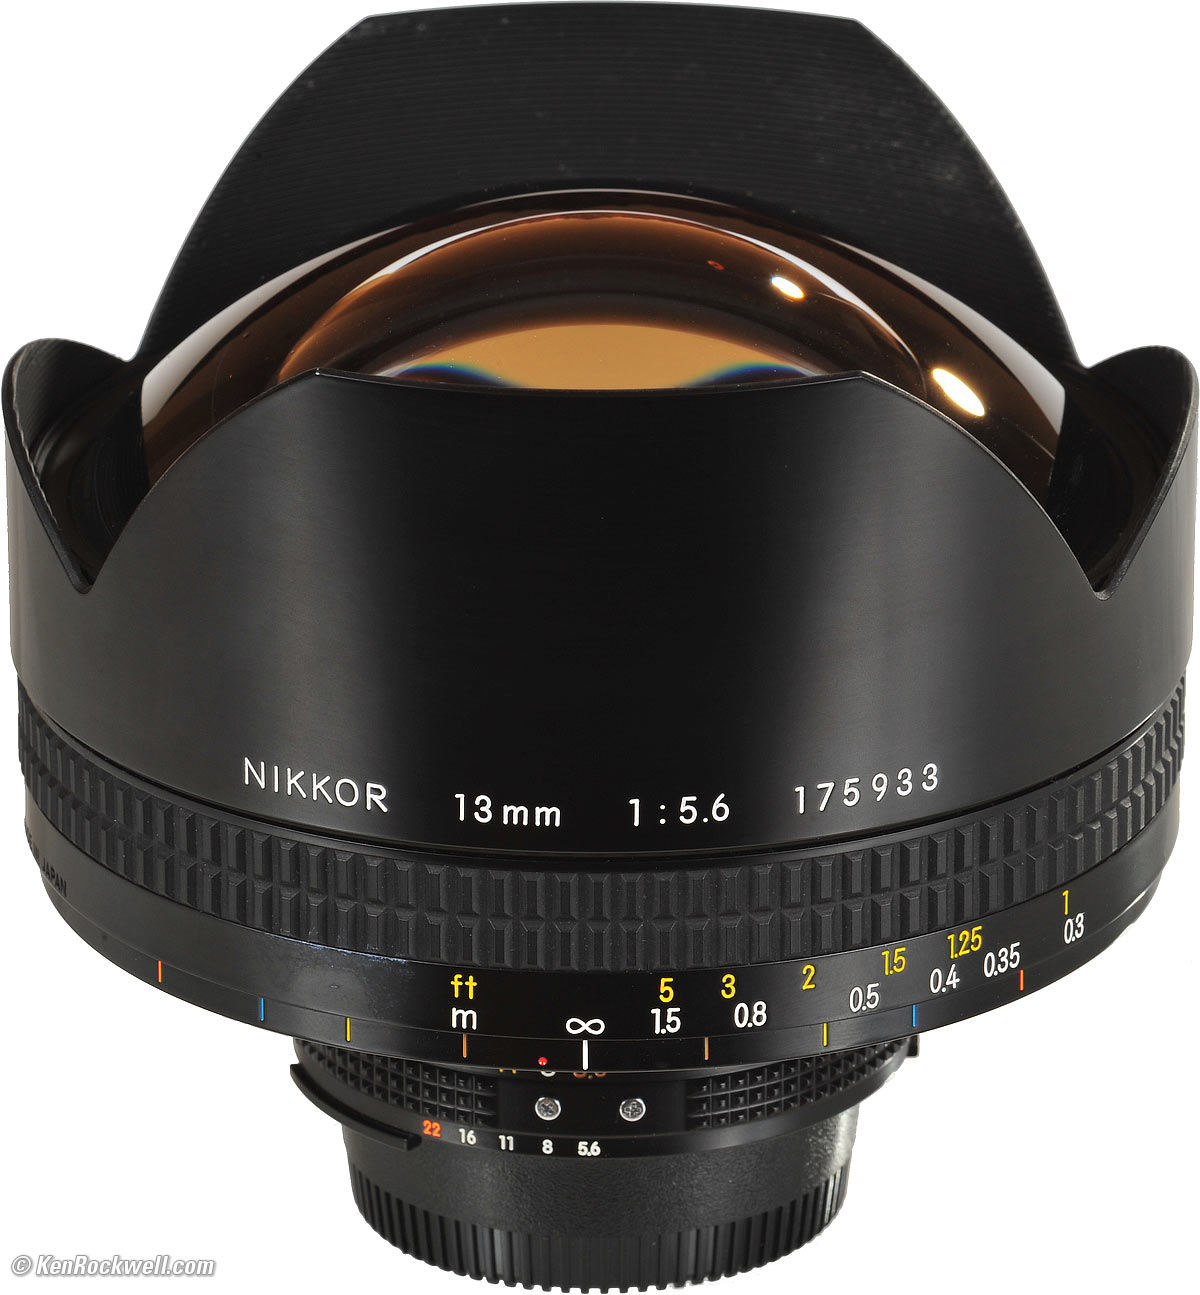
13mm f/5.6 AI-s (1976 -1998) top
The 13mm f/5.6 was the world's widest lens when it was introduced, and is still the widest non-distorting professional SLR lens ever made in all of history.
It covers FX; a DX lens would need a focal length of just 8.5mm to cover the same ultra-ultra wide angle!
Nikon 13mm f/5.6 swallowing a D300.
This beast is big and heavy: 5 inches (12cm) around and it weighs 3 pounds (1.4kg) with caps.
The 13mm is not a fisheye. Straight lines stay straight. In fact, just to show off, the 13mm has less distortion than zooms or most other normal and wide lenses! Drop a ruler on lines in the image, and they're straight.
It was made back when Nikon was still great enough and crazy enough to make things just because they could. It always cost a significant fraction of what the average American family earns in a year, and used ones today sell for about the same real price as when new: about $5,000 to $20,000.
I lusted after the 13mm ever since I was a kid in the 1970s. I saw one on display at Nikon House in Rockefeller Center in New York City in the 1970s, and saw one again in early 2008, from which I'll be penning a review one of these days.
Nikon only made these to special order, and only made a few hundred of them across 20 years. Customers who took factory delivery in Japan were treated to a ceremony where the lens was blessed by a Shinto priest. I've only seen two in my life, both in captivity, and never seen one in the field.
Sigma makes an inexpensive 12-24mm zoom that may be wider, but it's not a professional lens, its not a Nikon lens, and it distorts slightly. Nikon's 14mm f/2.8 and 14-24mm AF-S are not quite as wide, and have more distortion.
THis 13mm is also unusual in that it has little to no distortion of straight lines. Unlike zooms and most fixed lenses like the current 14mm f/2.8 and 14-24mm AF-S, make a photo of the horizon along the bottom or shoot a brick wall, and everything stays straight and square. Of course even the slightest tilt on your part throws everything into a bizarre angular array of converging and diverging lines, but that's the fun.
Don't expect ever to see one of these, since production was so low. Just get the 14-24mm AF-S , which is a lot less expensive, two stops faster and a lot sharper.
28-80mm G (2001-2006) and 28-200mm G (2003-2006) top
Nikon 28-80mm G, in ghastly silver.
These are very inexpensive plastic-mount lenses that came out in 2001 and 2003 for sale with Nikon's cheapest film cameras like the N55 and N75. No one paid any attention, because everyone was swapping over to digital cameras faster than Nikon guessed, leaving Nikon stuck with pallets of unsold N75s.
These two lenses incorporate every trick Nikon has learned over decades and decades of lens design and volume manufacturing. Each uses aspherical elements to improve performance and reduce size and weight.
Both are sharp, even in the corners. Even the 28-80mm G is sharper than the far more expensive 24-120mm VR, which made my 10-Worst list.
Each of these lenses isn't quite as sharp as Nikon's best, but pretty darn close. What gets them on my Best list is that they are this good at such a low price, and that they are tiny and weigh nothing for easy carrying.
The 28-200mm G is a miracle. Not only is it pretty sharp in most cases, what gets it on my Best list is that it focuses so closely at every focal length. It focuses down to 17 inches (43cm) at every focal length, much closer than any other Nikon tele, ever. Most teles, like the 135mm DC, often can't focus closely enough for photos of baby heads. This 28-200mm does. The AF isn't that fast since it covers such a wide range, but its fast enough.
The 28-80mm G focuses more closely than other Nikon lenses, often eliminating the need for a macro lens. It autofocuses faster than any other Nikon AF lens, including the AF-S lenses. Just try one; it's uncanny how instantly and exactly it focuses.
If I want a "do everything" lens for my D3 or D700, it's not the 24-120mm VR. It's the plastic 28-200mm G.
80-200mm f/4.5n AI (1977-1981) top
Nikon Zoom-NIKKOR 80-200mm f/4.5n AI.
Selling today for $35 at garage sales, or not more than $199 at dealers, this unassuming tele zoom just happens to be the sharpest tele zoom I've ever tested. In my 105mm center, 200mm center, 105mm corner and 200mm corner sharpness comparisons, it's the most consistent performer.
All Nikon's 80-200mm f/4.5 zooms are excellent. I found the best is this AI "n" (new) version, which is recognized by the black rectangular plate on its rear mount.
The zoom and focus are supposed to be loose and slippery. This was the sports and action lens of its day. No one was silly enough to shoot zooms on tripods pointed down, so creep wasn't the issue.
This Nikkor lens was made with such incredible precision that it didn't need to be pumped full of grease to fill up the internal slop of cheaper lenses of its day. It is so well made that it works with little or any lubrication, so it can work in temperature extremes and needs only a tiny flick to move the settings. Notice how it moves so easily, but that there is no play in any of the movement.
NIKON WORST LENS
Nikon's 10 Worst Lenses topEven lenses that aren't very sharp can be used to make incredibly great photos. However, as lenses go, these are the pigs at Nikon's party.
Given any of these lenses I could go make images as good as any of my others. As lenses go, each of these isn't just me saying they are duds; for each one, plenty of others have confirmed my observations. These are all this bad.
43-86mm F (1963-1976)
Nikon 43-86mm f/3.5 F.
The original Nikon 43-86mm is the worst lens Nikon has ever made.
It's worse than the worst, because not only is it terrible by itself, it was so awful that it has tainted the reputation of all other zoom lenses to this day.
What makes it so bad? It's Nikon's softest lens, and is loaded with untold levels of distortion. It also has awful flare and ghosts.
How bad it was! Ghosts everywhere!!! (D3, 43-86mm f/3.5 F at f/8)
When people say zooms aren't sharp, zooms flare, and zooms have a lot of distortion, it is because this horrible lens set these expectations.
The 43-86mm came in two versions. This first horrible version has the lettering inside the filter ring. The later version (1975-1982) is a completely different lens, and is just fine. It has its lettering outside the filter ring.
18mm f/2.8 D AF (1994-2006) top
This is Nikon's worst 18mm lens ever. The embarrassing part is that it cost $1,300 new (at full NYC discount), and still sells for about $800 used, and it's much worse than Nikon's older 18mm lenses.
It uses every trick Nikon knows, and is worse than earlier lenses!
The 18mm f/2.8 D AF uses internal focusing and aspheric elements, and somehow winds up being softer and having more distortion than Nikon's original 18mm f/4, 18mm f/3.5 AI-s, or their current zooms. It has a lot of falloff wide-open, too.
As we politely refer to a morbidly fat person as "having a slight weight problem," this 18mm lens has a slight ghosting problem. It has more ghosts than any other 18mm lens, and probably more ghosts than any other Nikon lens except the original 43-86mm above. I have no idea why it's so bad, but it is. This 18mm AF is one of the very few lenses for which I would use a hood. Good luck if you get stuck buying a used one without its original HB-8 hood; these hoods are now impossible to buy new or used.
The 18mm f/2.8 is a decent enough lens by itself. Since it's so expensive and even worse then the lenses it replaces, it earns itself the top position on my 10-worst list, just behind the hideous original 43-86mm.
300mm f/4.5 P (1964-1969) top
The 300mm f/4.5 P was Nikon's first 300mm SLR lens. It only had 5 elements (that's the "P," as in "penta"), and was loaded with color fringes.
Even on film, the results were always loaded with primary (red-blue) lateral color fringes on the sides of the picture. Stopping down made them worse, since as the lens sharpened up, the fringes became more visible.
In 1969 Nikon replaced this 300mm f/4.5 P lens with the excellent 300mm f/4.5 H. The H means 6 elements, as in "hex." Nikon made the excellent H version in various cosmetic variations though 1998.
24-120mm VR (2003-today) top
The 24-120mm VR is a failed dream because it's too darn soft. At 24mm, the corners on film and FX are soft. It's softer than any other Nikon lens I've tried at the wide end.
It's on my 10-worst list because it's new enough and made with enough technology that it ought to be fine. It's not, and Nikon's MTF curves show you that Nikon designed it this way.
This was the first lens I tried on my D3. Not only was it soft at the wide end, even stopped down, the corners got too darn dark from falloff at 120mm, where it's only f/5.6 wide-open.
35-70mm f/3.3-4.5 AI-s (1984-2005) top
Nikon 35-70mm f/3.3-4.5 AI-s.
This is a cheap and crappy lens. Nikon has made other cheap lenses which make it to my 10-Best list that are great.
This lens simply isn't very sharp, and is unbecoming to Nikon's manual focus Nikkor lenses with its use of plastic. The focus, zoom and aperture rings are plastic, and even the silver grab ring may be plastic. It looks like a tough metal Nikkor, but it's not. I don't mind plastic if it's sharp like the Series E lenses, but this isn't a sharp lens. Its loaded with distortion, too.
The same optics appeared in an AF version in 1986. As an AF lens, the optics are sad, but the mechanics and usability are swell, so I wouldn't put it on my Worst list if it weren't for the dishonorable manual focus version above.
Nikon 35-70mm f/3.3-4.5 AF. (1986-1994)
Nikon also sells, even today, a 35-70mm f/3.5-4.8 manual focus lens sold with the FM-10. It doesn't make it to this list because it isn't even a Nikon lens. It's really a Cosina lens made by Cosina and branded Nikon.
Nikon 45mm f/2.8 P (2001-2006) top
The 45mm f/2.8 was introduced in 2001 as a vanity accessory along with the new Nikon FM3a manual-focus body.
It was very expensive, $450, and was claimed to have magical powers which imbued it with extraordinary optical performance. We rational types read Nikon's PR which said that it was just a primitive Tessar design.
The Tessar design, over 100 years old, was good in its day, but the Nikon 45mm P is far softer than the $120 made-in-China 50mm f/1.8 AF lens in my 10-Best list. Sure, this 45mm is small, but its performance is sucky (especially in the corners of FX) compared to every other current Nikon normal lens, and it costs far more. If you're just shooting DX, you aren't using the corners and it probably looks fine.
The P in this lens stands for "Program," as this manual-focus lens has electronic contacts to let it talk to the metering systems of digital and autofocus film Nikons. All cameras treat this lens as if it's an AF lens, except that it can't autofocus.
Needless to say, Nikon didn't fool anyone, and discontinued this lens with lots of stock on dealer's shelves in 2006. Its only purpose, other than as a tiny lens, is as a collectors item, since it was packaged as a couture item shipped with with color-coordinated caps, hood and a filter.
And just like couture items, it's a pain to use. Its so tiny that there is no room for a grip ring for mounting and unmounting, so you have to run the focus or aperture to one end before you get any traction to the mount. People whined about the thin plastic focus rings of Nikon's first AF lenses, but the 45mm P is the worst. Its focus ring is a cold, hard, miniscule metal ring, Nikon's worst ever. Even the scalloped rings of Nikon's first SLR lenses were far better, as were the wider rings on Nikon's 1940's rangefinder lenses.
It uses almost the same optics as Nikon's 45mm f/2.8 GN (1968-1977), which was Nikon's very least expensive lens in its day. I've compared them both on the D3, and they are both about the same. The older 45 GN additionally offered a superior 9-bladed (later 7-bladed) diaphragm, and a built-in analog computer that calculated flash exposure automatically as focused. This 45 P offers none of this. The 45 GN is a decent lens, but when you try to charge this much for the 45 P, it's on the bottom my suck list.