Ultra wide angle
10 ~ 15 mm
10 ~ 20 mm
11 ~ 18 mm
wide angle
19 ~ 35mm
Wednesday, 21 January 2009
Saturday, 10 January 2009
Different between Lens
TELEPHOTO LENS AND TELEPHOTO ZOOM LENS / ZOOM LENS.
Tele means distant or distance, tele is used to describe a "longer" view - a tele lens will make things appear closer
a tele lens is the oppisite of a wide lens, a wide lens gives a wide view,
so telephoto lens see a longer distance, a zoom lens is a lens that goes from a wide setting to a tele setting
eg's
wide lenses have numbers like: 12mm 14mm up to 35mm,
tele lens are numbers like 70mm - 800mm or so
A zoom lens can cover any focal length range and still be considered a zoom lens.
A zoom lens can also incorporate a telephoto group, in which case it would be called a telephoto zoom lens.
standard is from around 45 - 55mm ish
zoom lenses have numbers like 12-24mm - wide zoom lens
18-55 wide - standard zoom lens
55-200 standard to tele
A zoom lens can cover any focal length range and still be considered a zoom lens.
A zoom lens can also incorporate a telephoto group, in which case it would be called a telephoto zoom lens.
In others words is Telephoto lens is 100mm f 2.4 (fix focus length) and Telephoto Zoom lens / Zoom lens is 50 mm ~ 100mm f 2.4~ 6. (adjustable focus length)
MACRO LENS
A macro lens is used for taking close up pictures of small objects such as coins, bugs, jewelry, and other small things. Macro lenses also allow you to capture the details in smaller objects.
WIDE ANGLE LENS
Lens less than 35mm is consider wide angle lens and lens 10mm~18 consider ultra wide angle.
You remember the old cliche' where the photographer asks the subject to step back. Then, step back a little more. And then again?
The wide angle lens allows the photo to be taken without the subject haveing to step back.
In a more realistic situation, for example, taking a photo in a very small space, where there is no room for the photographer or subject to step back, a wide angle lens allows the camera to capture more horizontal and verticle space.
PRIME LENS
All lens design has compromises, a prime lens has a lot fewer than any zoom so tends to perform better (more contrast, better resolution etc..)
The first prime to consider is a 50mm, these are the easiest lens for manufacturers to make and are often available with a 'fast' wide aperture (f1.4 is common), this is useful for low light shots (interiors, concerts etc.) it also means you can use selective focusing (where the subject is in focus and the background blurry) as the wider aperture maximises this effect.
Every DSLR owner should have one in his camera bag, if your DSLR has an APS sized sensor then the crop factor will make it a 75 - 80mm lens, which is absolutely the best focal length for portraits (keeps you away from your subject and doesn't distort their features).
Nikon 10 Best lenses and worst lens.
Nikon's Best Lenses top
LINK
LINK
50mm f/1.8D AF (1978-today)
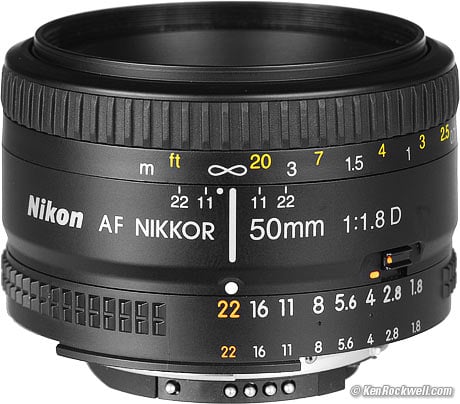
Nikon's least expensive lens is also among its sharpest. It has no distortion, focuses almost instantly, and it's Nikon's smallest and lightest lens.
It is among Nikon's fastest lenses, and covers film and the full FX frame.
Except that the D40, D40x and D60 can't autofocus with it (neither can the F3), there is no reason not to own one of these, unless you opt for the twice as expensive 50mm f/1.4 D.
All the earlier 50mm f/1.8 lenses are also all excellent, including the 50mm f/1.8 AF (non-D), 50mm f/1.8 Nikkor manual focus, and the 50mm f/1.8 Series E.
Nikon 18-55mm DX (2006-today) top
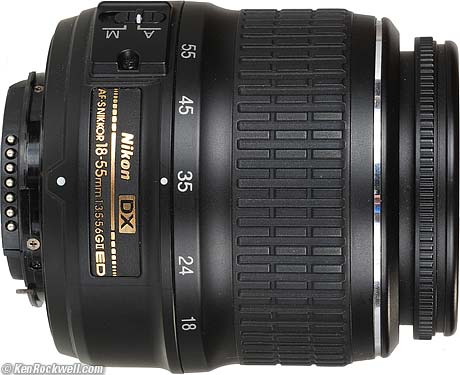
Even as a cheap, plastic lens, the 18-55mm is sharp, sharp, sharp, and focuses so close that few people will need a dedicated macro lens.
Included as a kit lens with Nikon's cheapest cameras, lenses this good and this cheap ask us what would happen if Nikon put some of this same mojo into its more expensive lenses.
It only covers DX digital; it can't cover film or FX.
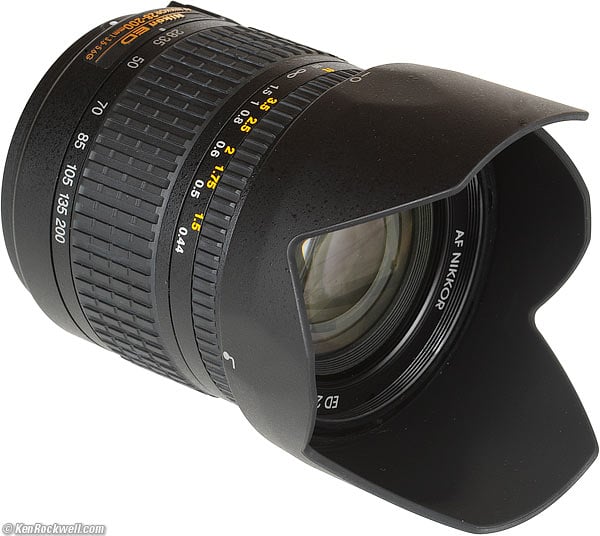
18-200mm VR DX (2005-today) top
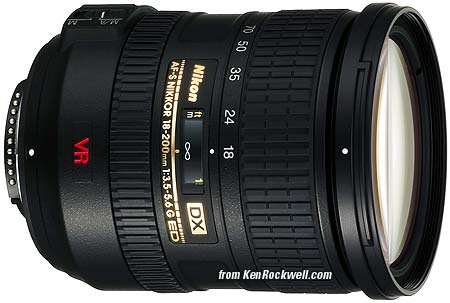
The 18-200mm VR is the freedom lens. It is the lens which let me get rid of the old fashioned "camera bag" photographers used to have to carry.
The 18-200mm VR replaces all the lenses we used to haul around. The only thing it doesn't do is replace an ultra-wide lens like the 12-24mm DX, or allow us to shoot sports in dim light like the 70-200mm VR. If you need anything longer, you'll get better photos by getting closer with the 18-200 VR than you will by using a longer lens like the 600mm VR.
Back in the days of DX cameras, the 18-200mm let me just go and shoot, and not have to carry other lenses or have to change them in a middle of a shoot.
135mm f/2 DC AF (1990 - today) top

Americans just don't get this lens, because Nikon messed up its name. The 135mm DC, or "Defocus Control," lens, is among Nikon's sharpest lenses ever. Defocus control doesn't mean soft focus, it means "background softness control." The DC feature is really Bokeh optimization.
The DC feature always keeps the subject ultra sharp, and allows the photographer to defocus just the background (or foreground) into the softest, smoothest, dreamiest and creamiest pastels ever.
The 135mm DC is Nikon's best hand-held portrait lens ever, as well as a killer-sharp 135mm lens for everything.
14-24mm f/2.8 AF-S (2007-today) top

The big, heavy 14-24mm f/2.8 AF-S just rewrote the book on ultra-wideangle lens performance. It raises the performance bar about 20 years ahead of every other ultra-wideangle SLR lens.
The 14-24mm is sharp, sharp, sharp, even wide open, and even in the corners.
It's so good that people are buying special adapters just to use them on Canon cameras!
The 14-24mm is excellent on amateur DX cameras like the D300, but doesn't really start pumping until you use it on film or a full-frame FX digital camera.
I've shot a lot of fixed 24mm, 20mm, 18mm, 17mm, 15mm and 14mm lenses in my days, and this zoom smokes them all. It lets me do things I never could, like jump into a dark, abandoned building without a tripod, shoot away at f/2.8 and high ISOs on a D3, and get out with excellent photos for which I don't need to make any excuses.
85mm f/1.4 AI-s (1981-2006) top
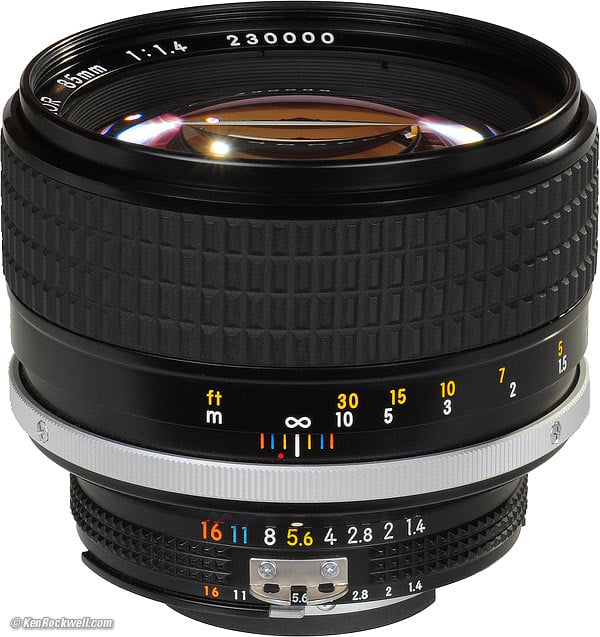
The optics of most of Nikon's earlier AI-s manual focus lenses have been exceeded in Nikon's newer AF lenses. This isn't the case here.
This manual focus lens outperforms its newer 85mm f/1.4 D autofocus sibling. In fact, its so good that even after the f/1.4 autofocus lens came out, for about the about the same price, Nikon kept making these for 10 more years!
It's sharper than the new AF lens, and it has much better bokeh than most other Nikon lenses.
If I'm photographing moving people and kids, of course I'll prefer the AF lens, but if I'm hugging a tripod, the King is still the King.
28mm f/1.4D AF (1994-2006) top

Nikon 28mm f/1.4 D AF. (blacked-out for national security purposes)
Nikon was once great. Nikon spent ten years perfecting this masterpiece, then discontinued it in 2006 from lack of market interest. Collectors finally figured it out, and they sell used for double what they sold for new.
This lens is special because its sharp, even in the corners, even wide-open at f/1.4. It is worlds better than today's 35mm f/1.4 (which is a manual focus lens made since 1969) or the manual focus 28mm f/2.
This lens allowed me to shoot things hand-held on ISO 50 film that otherwise I could not.
Because it has half the focal length of a 50mm lens, it can be hand-held at for exposure times twice as long. This lets me shoot hand-held in light twice as dim as with a 50m f/1.4 lens, or in the same light as a 50mm f/1 lens.
Unlike a 50mm lens, it has far more depth of field at the same f/stop. This additional depth of field also contributes to sharp hand-held photos at night. This 28mm lens at f/1.4 has enough depth of field for most things, while 50mm f/1.4 lenses have paper-thin depths of field
With digital it's no longer as needed, since digital allows high ISOs that film could not. The rise of digital contributed to lack of interest in buying these 28mm f/1.4 lenses new.
70-180mm f/4.5-5.6D Micro (1997-2004) top
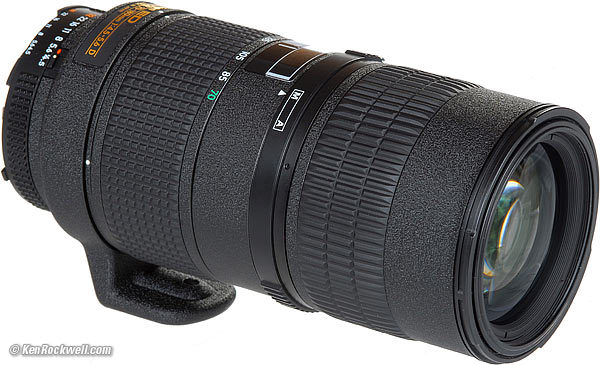
Nikon ED 70-180mm f/4.5-5.6 D AF Micro.
Another lens so great that the market never figured it out, this is the only true zoom Micro (macro) lens ever made by Nikon. It also sells used for more than it sold for when new.
Unless you're photographing stamps, which makes you silly because you'll get better images sticking them in a scanner, shooting macro is a real pain having to move in and out all the time to frame products and chasing moving subjects like poisonous snakes. I know snake guys who pack heat to protect their 70-180mm lenses; these lenses are that good and irreplaceable.
All of my recent product shots, like half the shots on this page, are shot with this lens.
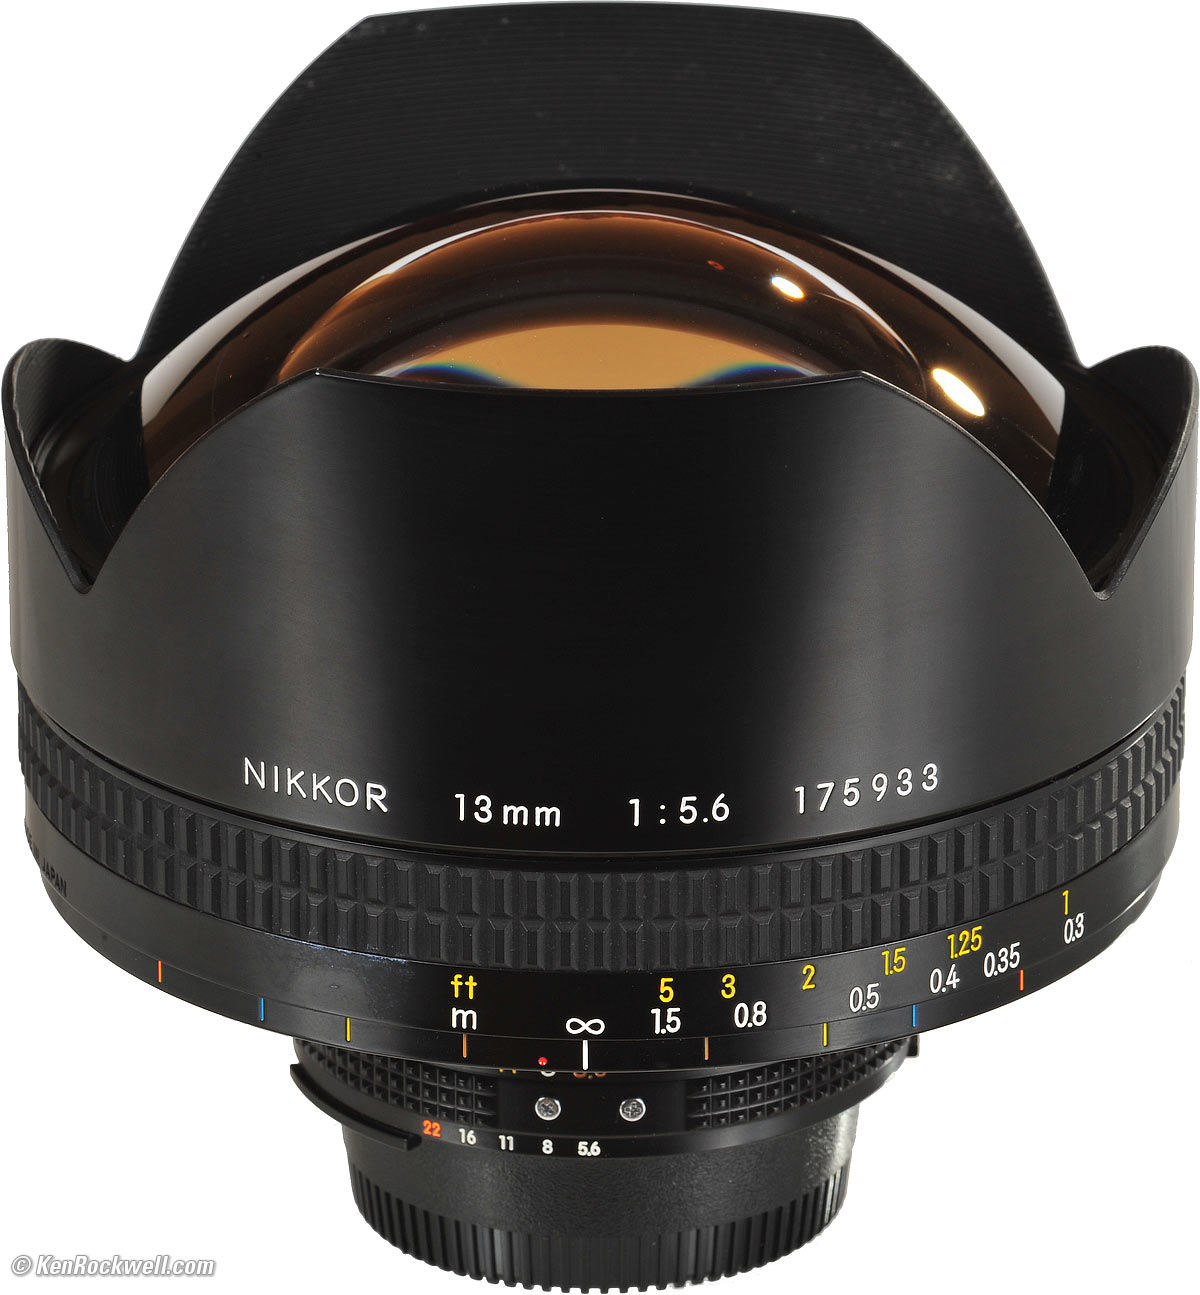
13mm f/5.6 AI-s (1976 -1998) top
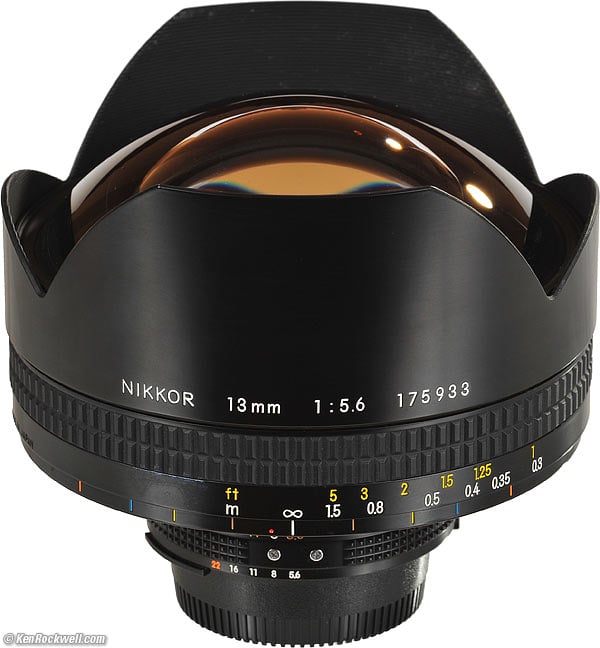
The 13mm f/5.6 was the world's widest lens when it was introduced, and is still the widest non-distorting professional SLR lens ever made in all of history.
It covers FX; a DX lens would need a focal length of just 8.5mm to cover the same ultra-ultra wide angle!
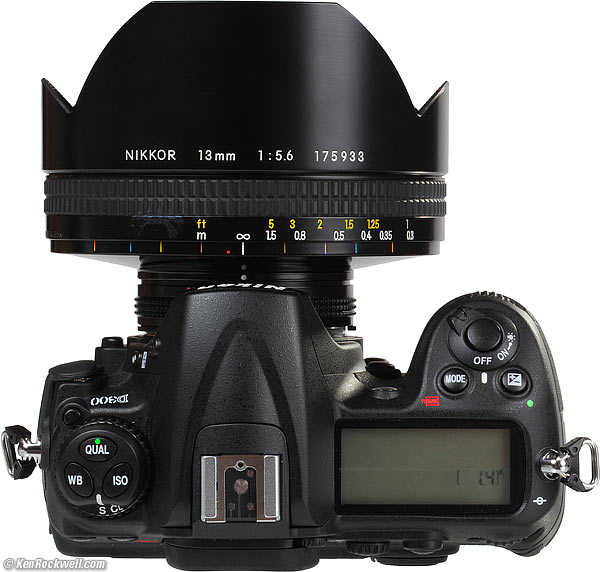
Nikon 13mm f/5.6 swallowing a D300.
This beast is big and heavy: 5 inches (12cm) around and it weighs 3 pounds (1.4kg) with caps.
The 13mm is not a fisheye. Straight lines stay straight. In fact, just to show off, the 13mm has less distortion than zooms or most other normal and wide lenses! Drop a ruler on lines in the image, and they're straight.
It was made back when Nikon was still great enough and crazy enough to make things just because they could. It always cost a significant fraction of what the average American family earns in a year, and used ones today sell for about the same real price as when new: about $5,000 to $20,000.
I lusted after the 13mm ever since I was a kid in the 1970s. I saw one on display at Nikon House in Rockefeller Center in New York City in the 1970s, and saw one again in early 2008, from which I'll be penning a review one of these days.
Nikon only made these to special order, and only made a few hundred of them across 20 years. Customers who took factory delivery in Japan were treated to a ceremony where the lens was blessed by a Shinto priest. I've only seen two in my life, both in captivity, and never seen one in the field.
Sigma makes an inexpensive 12-24mm zoom that may be wider, but it's not a professional lens, its not a Nikon lens, and it distorts slightly. Nikon's 14mm f/2.8 and 14-24mm AF-S are not quite as wide, and have more distortion.
THis 13mm is also unusual in that it has little to no distortion of straight lines. Unlike zooms and most fixed lenses like the current 14mm f/2.8 and 14-24mm AF-S, make a photo of the horizon along the bottom or shoot a brick wall, and everything stays straight and square. Of course even the slightest tilt on your part throws everything into a bizarre angular array of converging and diverging lines, but that's the fun.
Don't expect ever to see one of these, since production was so low. Just get the 14-24mm AF-S , which is a lot less expensive, two stops faster and a lot sharper.
28-80mm G (2001-2006) and 28-200mm G (2003-2006) top
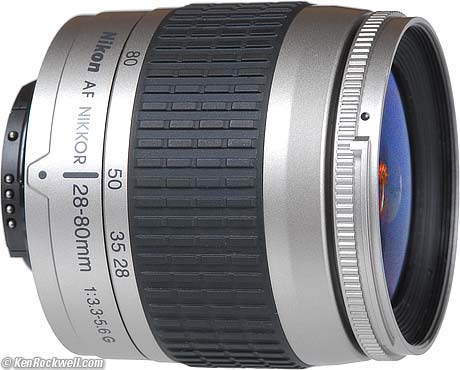
Nikon 28-80mm G, in ghastly silver.
These are very inexpensive plastic-mount lenses that came out in 2001 and 2003 for sale with Nikon's cheapest film cameras like the N55 and N75. No one paid any attention, because everyone was swapping over to digital cameras faster than Nikon guessed, leaving Nikon stuck with pallets of unsold N75s.
These two lenses incorporate every trick Nikon has learned over decades and decades of lens design and volume manufacturing. Each uses aspherical elements to improve performance and reduce size and weight.
Both are sharp, even in the corners. Even the 28-80mm G is sharper than the far more expensive 24-120mm VR, which made my 10-Worst list.
Each of these lenses isn't quite as sharp as Nikon's best, but pretty darn close. What gets them on my Best list is that they are this good at such a low price, and that they are tiny and weigh nothing for easy carrying.
The 28-200mm G is a miracle. Not only is it pretty sharp in most cases, what gets it on my Best list is that it focuses so closely at every focal length. It focuses down to 17 inches (43cm) at every focal length, much closer than any other Nikon tele, ever. Most teles, like the 135mm DC, often can't focus closely enough for photos of baby heads. This 28-200mm does. The AF isn't that fast since it covers such a wide range, but its fast enough.
The 28-80mm G focuses more closely than other Nikon lenses, often eliminating the need for a macro lens. It autofocuses faster than any other Nikon AF lens, including the AF-S lenses. Just try one; it's uncanny how instantly and exactly it focuses.
If I want a "do everything" lens for my D3 or D700, it's not the 24-120mm VR. It's the plastic 28-200mm G.
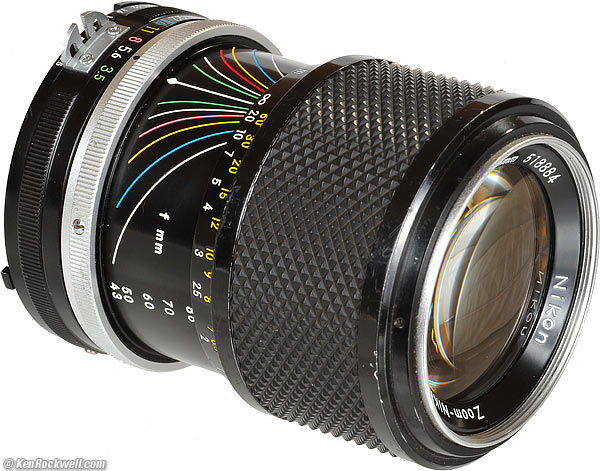
80-200mm f/4.5n AI (1977-1981) top

Nikon Zoom-NIKKOR 80-200mm f/4.5n AI.
Selling today for $35 at garage sales, or not more than $199 at dealers, this unassuming tele zoom just happens to be the sharpest tele zoom I've ever tested. In my 105mm center, 200mm center, 105mm corner and 200mm corner sharpness comparisons, it's the most consistent performer.
All Nikon's 80-200mm f/4.5 zooms are excellent. I found the best is this AI "n" (new) version, which is recognized by the black rectangular plate on its rear mount.
The zoom and focus are supposed to be loose and slippery. This was the sports and action lens of its day. No one was silly enough to shoot zooms on tripods pointed down, so creep wasn't the issue.
This Nikkor lens was made with such incredible precision that it didn't need to be pumped full of grease to fill up the internal slop of cheaper lenses of its day. It is so well made that it works with little or any lubrication, so it can work in temperature extremes and needs only a tiny flick to move the settings. Notice how it moves so easily, but that there is no play in any of the movement.
NIKON WORST LENS
Nikon's 10 Worst Lenses topEven lenses that aren't very sharp can be used to make incredibly great photos. However, as lenses go, these are the pigs at Nikon's party.
Given any of these lenses I could go make images as good as any of my others. As lenses go, each of these isn't just me saying they are duds; for each one, plenty of others have confirmed my observations. These are all this bad.
43-86mm F (1963-1976)
Nikon 43-86mm f/3.5 F.
The original Nikon 43-86mm is the worst lens Nikon has ever made.
It's worse than the worst, because not only is it terrible by itself, it was so awful that it has tainted the reputation of all other zoom lenses to this day.
What makes it so bad? It's Nikon's softest lens, and is loaded with untold levels of distortion. It also has awful flare and ghosts.
How bad it was! Ghosts everywhere!!! (D3, 43-86mm f/3.5 F at f/8)
When people say zooms aren't sharp, zooms flare, and zooms have a lot of distortion, it is because this horrible lens set these expectations.
The 43-86mm came in two versions. This first horrible version has the lettering inside the filter ring. The later version (1975-1982) is a completely different lens, and is just fine. It has its lettering outside the filter ring.
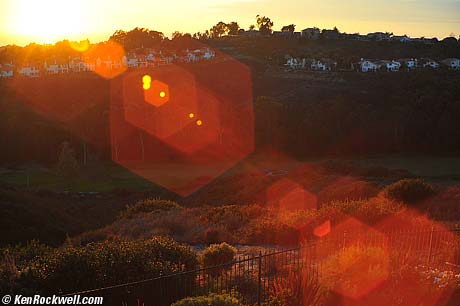
18mm f/2.8 D AF (1994-2006) top
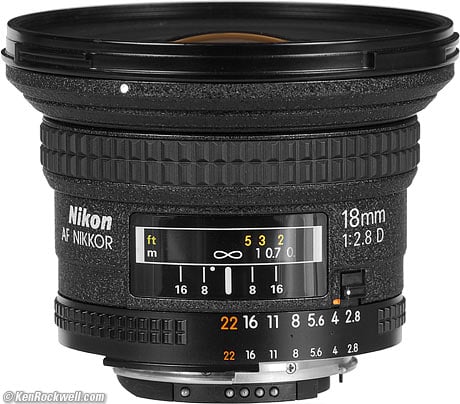
This is Nikon's worst 18mm lens ever. The embarrassing part is that it cost $1,300 new (at full NYC discount), and still sells for about $800 used, and it's much worse than Nikon's older 18mm lenses.
It uses every trick Nikon knows, and is worse than earlier lenses!
The 18mm f/2.8 D AF uses internal focusing and aspheric elements, and somehow winds up being softer and having more distortion than Nikon's original 18mm f/4, 18mm f/3.5 AI-s, or their current zooms. It has a lot of falloff wide-open, too.
As we politely refer to a morbidly fat person as "having a slight weight problem," this 18mm lens has a slight ghosting problem. It has more ghosts than any other 18mm lens, and probably more ghosts than any other Nikon lens except the original 43-86mm above. I have no idea why it's so bad, but it is. This 18mm AF is one of the very few lenses for which I would use a hood. Good luck if you get stuck buying a used one without its original HB-8 hood; these hoods are now impossible to buy new or used.
The 18mm f/2.8 is a decent enough lens by itself. Since it's so expensive and even worse then the lenses it replaces, it earns itself the top position on my 10-worst list, just behind the hideous original 43-86mm.
300mm f/4.5 P (1964-1969) top
The 300mm f/4.5 P was Nikon's first 300mm SLR lens. It only had 5 elements (that's the "P," as in "penta"), and was loaded with color fringes.
Even on film, the results were always loaded with primary (red-blue) lateral color fringes on the sides of the picture. Stopping down made them worse, since as the lens sharpened up, the fringes became more visible.
In 1969 Nikon replaced this 300mm f/4.5 P lens with the excellent 300mm f/4.5 H. The H means 6 elements, as in "hex." Nikon made the excellent H version in various cosmetic variations though 1998.
24-120mm VR (2003-today) top
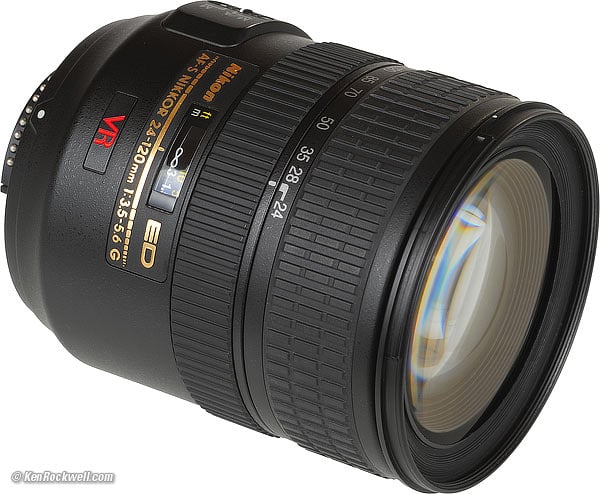
The 24-120mm VR is a failed dream because it's too darn soft. At 24mm, the corners on film and FX are soft. It's softer than any other Nikon lens I've tried at the wide end.
It's on my 10-worst list because it's new enough and made with enough technology that it ought to be fine. It's not, and Nikon's MTF curves show you that Nikon designed it this way.
This was the first lens I tried on my D3. Not only was it soft at the wide end, even stopped down, the corners got too darn dark from falloff at 120mm, where it's only f/5.6 wide-open.
35-70mm f/3.3-4.5 AI-s (1984-2005) top
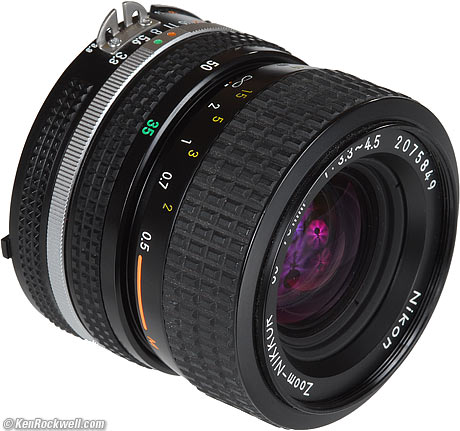
Nikon 35-70mm f/3.3-4.5 AI-s.
This is a cheap and crappy lens. Nikon has made other cheap lenses which make it to my 10-Best list that are great.
This lens simply isn't very sharp, and is unbecoming to Nikon's manual focus Nikkor lenses with its use of plastic. The focus, zoom and aperture rings are plastic, and even the silver grab ring may be plastic. It looks like a tough metal Nikkor, but it's not. I don't mind plastic if it's sharp like the Series E lenses, but this isn't a sharp lens. Its loaded with distortion, too.
The same optics appeared in an AF version in 1986. As an AF lens, the optics are sad, but the mechanics and usability are swell, so I wouldn't put it on my Worst list if it weren't for the dishonorable manual focus version above.

Nikon 35-70mm f/3.3-4.5 AF. (1986-1994)
Nikon also sells, even today, a 35-70mm f/3.5-4.8 manual focus lens sold with the FM-10. It doesn't make it to this list because it isn't even a Nikon lens. It's really a Cosina lens made by Cosina and branded Nikon.
Nikon 45mm f/2.8 P (2001-2006) top
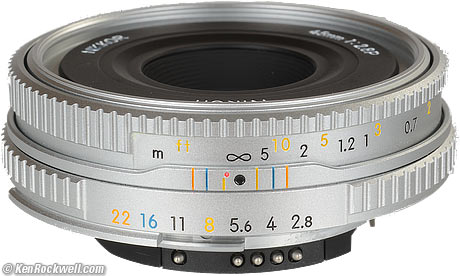
The 45mm f/2.8 was introduced in 2001 as a vanity accessory along with the new Nikon FM3a manual-focus body.
It was very expensive, $450, and was claimed to have magical powers which imbued it with extraordinary optical performance. We rational types read Nikon's PR which said that it was just a primitive Tessar design.
The Tessar design, over 100 years old, was good in its day, but the Nikon 45mm P is far softer than the $120 made-in-China 50mm f/1.8 AF lens in my 10-Best list. Sure, this 45mm is small, but its performance is sucky (especially in the corners of FX) compared to every other current Nikon normal lens, and it costs far more. If you're just shooting DX, you aren't using the corners and it probably looks fine.
The P in this lens stands for "Program," as this manual-focus lens has electronic contacts to let it talk to the metering systems of digital and autofocus film Nikons. All cameras treat this lens as if it's an AF lens, except that it can't autofocus.
Needless to say, Nikon didn't fool anyone, and discontinued this lens with lots of stock on dealer's shelves in 2006. Its only purpose, other than as a tiny lens, is as a collectors item, since it was packaged as a couture item shipped with with color-coordinated caps, hood and a filter.
And just like couture items, it's a pain to use. Its so tiny that there is no room for a grip ring for mounting and unmounting, so you have to run the focus or aperture to one end before you get any traction to the mount. People whined about the thin plastic focus rings of Nikon's first AF lenses, but the 45mm P is the worst. Its focus ring is a cold, hard, miniscule metal ring, Nikon's worst ever. Even the scalloped rings of Nikon's first SLR lenses were far better, as were the wider rings on Nikon's 1940's rangefinder lenses.
It uses almost the same optics as Nikon's 45mm f/2.8 GN (1968-1977), which was Nikon's very least expensive lens in its day. I've compared them both on the D3, and they are both about the same. The older 45 GN additionally offered a superior 9-bladed (later 7-bladed) diaphragm, and a built-in analog computer that calculated flash exposure automatically as focused. This 45 P offers none of this. The 45 GN is a decent lens, but when you try to charge this much for the 45 P, it's on the bottom my suck list.
Friday, 9 January 2009
Making Sense of Lens Acronyms
Note: with pre-AI lenses Nikon often used a single letter abbreviation to indicate the number of elements in the lens: U (uni) =1, B (bi) =2, T (tri) = 3, Q (quadra) = 4, P (penta)-5, H (hexa) = 6, S (septa) =7, O (octa) = 8, N (nona) = 9, and D (deca) = 10). Usually these letters were appended to Nikkor, as in Nikkor-Q 135/2.8, which would be a pre-AI 135mm f/2.8 lens with four elements (Q). Keep that in mind when deciphering the alphabet soup Nikon has used over the years. If you're dealing with a really old lens, a single letter alongside the Nikkor is likely to refer to elements, not the terms shown below.
A -- The original bayonet lens type (1959). Manual focus lens. Considered Pre-AI
ADR -- Aperture Direct Readout. A fancy way of saying that aperture scale can be seen directly by the cameras that have overhanding prisms (ala F4, F5). Started with AI lenses in 1977.
AF-I -- An autofocus lens with an Integrated, coreless focus motor (1992). All AF-I lenses are D-type, but some older bodies can't autofocus with them (N60, N8008).
AF-S -- An autofocus lens with a Silent wave, integrated, coreless focus motor (1996). Basically an update to AF-I. Some older bodies can't autofocus with them (N60, N8008). Some newer bodies (D40, D40x) can only autofocus with them.
AI -- Aperture Indexing (1977). Manual focus lens.
AI-P -- An AI lens variant (1988) that was "chipped" to send data to the camera.
AI-S -- A variant of AI designed to be used with Program and Shutter-priority exposure modes (1982). Manual focus lens. Distinguished by smallest aperture being printed in orange and a small scoop on the bayonet flange, which transmits aperture info. Otherwise same as AI.
ASP -- Lens has aspherical elements in its optic design. Aspherical lenses eliminate coma and other types of lens aberrations by using complex curves in the design of lens elements.
C -- A lens coating type (Nikon Integrated Coating) for Pre-AI lenses. Distinguished by a C after the lens designation and a black filter ring.
CRC -- Close Range Correction, means that the lens was designs to provide superior focusing at close distances and with flat fields.
D -- (1992) Adds distance information to the data transmitted to the camera via chip. Distinguished by the D or G after the lens designation.
DC -- Defocus Control lens, allows the photographer to change the degree of spherical aberration in the out-of-focus areas to provide for better bokeh.
DX -- (2003) Indicates a lens designed to cover the smaller image circle of the digital camera bodies. May still work on 35mm bodies at some focal lengths.
E -- A special type of AI lens (1977) introduced with the consumer-oriented EM body. Says Nikon Series E on the lens. Light in weight, plastic in construction, but optically good.
ED -- Extra-low Dispersion element(s) used in the lens.
FX -- (2007) 35mm full frame digital sensor. While Nikon doesn't explicitly use this acronym yet with lenses, it has used it casually to refer to lenses that cover the full 35mm film (and FX digital sensor) frame, as opposed to lenses that cover smaller imaging sizes, such as DX or IX.
G -- Removes the aperture ring from a D-type lens. Thus needs to be used on camera with Command dial control of apertures. With some older cameras (N90s, for example), can be used in Program or Shutter-priority exposure mode, though.
IF -- Lens uses internal focusing rather than moving or turning outer elements.
IX -- Lenses for the Pronea system (Advanced Photo System). Can't be used on the 35mm or digital bodies.
K -- Another Pre-AI lens type, this time with rubber focus rings.
N -- Originally, the actual designation used for the first AI lenses; beginning in 2005 it now stands for Nano Crystal Coat, a special type of flare reduction coating applied to newer lenses.
N (gold emblem)-- Nano coating. A crystalline coating that eliminates internal lens element reflections, reducing ghosting and flare.
NIC -- Nikon Integrated Coating. A fancy way of referring to Nikon's glass coating system, which is used to help reduce flare and ghosting.
PC -- Perspective Control lens, allows the front of the lens to be shifted relative to the rest of the lens to correct for perspective. All PC lenses are either AI or AI-P in type.
RF -- Rear Focusing, means that lens achieves focusing by moving the rear elements; similar to IF.
SIC -- Super Integrated Coating, a multi-layer flare reduction coating, usually applied to the more complex zoom lenses.
SWM -- Silent Wave Motor. This is the motor in the lens used in AF-I and AF-S lenses.
UW -- Underwater lenses, destined for the Nikonos systems.
VR -- Vibration Reduction lens, corrects for camera movement during exposure. VR function only works on post F5 cameras (e.g., not F4, N90s, N60, N70, N8008). Lately, Nikon has been using a VRII designation to indicate some advances to the vibration reduction system.
Conversion for Nikon Lens
D40, D40x and D60: Good news! Virtually any Nikon-mount lens will fit safely on the camera with no need for conversion. You will have no TTL metering with manual focus lenses but you can set the body to M (Manual) mode and make the shutter speed and aperture settings by guessing or using a handheld meter. Your exposure can be checked in the LCD almost immediately, of course.
Special note on the D40 series and D60: Although this new body has lots of great features, it does not have the autofocus motor. Thus, it needs the lenses that contain the motor in order to use the autofocus. These lenses are marked as AF-S or AF-I. Other AF lenses can be used as-is. They will have metering but focusing will be only manual.
D80, D70s & D50 (and bodies with similar lens mounting/coupling systems such as the D100, D70, N80, N65, N60, N5005, N4004, Fuji Digital SLRs and recent Kodak DCS Pro models):
Lenses that are AF, AI-s, AI, Series E and older ones that were converted to AI by Nikon can be used as-is on these bodies. You will have no TTL metering with manual focus lenses but you can set the body to M (Manual) mode and make the shutter speed and aperture settings manually. Your exposure can be checked in the LCD almost immediately, of course.
Pre-AI Nikon lenses (ones made before 1978) need my Type B conversion ($35 each) in order to be used on the D70 and D100 in the manner described above. See the Prices and Shipping page for details.
Unconverted lenses should not be mounted on these bodies because of the interference between the aperture ring and the minimum aperture sensing switch (at about the 8 o’clock position outside the lens mount as you face into the mirror box). This warning also applies to lenses I converted to AI in the past. Any of those lenses can be brought up to the Type B level for $10.
Tuesday, 6 January 2009
Exposure Basics
Exposure Basics: Correctly Expose Your Photographs
Every picture taking opportunity allows you to record no less than six correct exposures!
Perhaps you have already figured it out after reading the above, but if not, you will soon know that most picture taking situations have at least six possible combinations of f/stops and shutters speeds that will all result in a correct exposure; not a creatively correct exposure but a correct exposure. But only one, sometimes two, of these combinations of f/stops and shutter speeds is the creatively correct motion-filled exposure.
Again, let’s review, that every ‘correct’ exposure is nothing more then the quantitative value of an aperture and shutter speed working together within the ‘confines’ of a predetermined ‘ISO’. For the sake of argument we are both out photographing a city skyline at dusk, using a film speed of 100 ISO and an aperture opening of f/5.6 and whether we are shooting in manual mode or aperture priority mode the light meter indicates a correct exposure at 1 second. What other combinations of aperture openings (f/stops) and shutter speeds can we use and still record a ‘correct’ exposure? If I suggest we use an aperture of f/8 what would the shutter speed now be? Since we have cut the lens opening in half (f/5.6 to f/8) I will now need to double my shutter speed time to two seconds to record a correct exposure, (1 sec + 1 sec= 2 seconds.) On the other hand, If I suggested that we use an aperture of f/4 what would the shutter speed now be? Since we have just doubled the size of the lens opening (f/5.6 to f/4) I will now need to cut my shutter speed in half (1/2 second) to record the same ‘quantitative value exposure’.
Easy yet hard, right?
For a refresher on these terms, take a look at Bryan’s intro article on Basic Photo Tips: Aperture, Shutter Speed, and ISO.
The Equations
The following are equivalent:
- f/4 at 1/2 second
- f/5.6 at 1 second
- f/8 at 2 seconds
- f/11 at 4 seconds
- f/16 at 8 seconds
- f/22 at 16 seconds
Add them up and what have you got? Six possible combinations of aperture and shutter speeds that will all result in exactly the same exposure. I want to stress the word ‘same’; it is meant to mean the ‘same’ in terms of quantitative value only!
Likewise, if we find ourselves taking an outdoor portrait at the park with our telephoto zoom, we find that with our aperture set to f/16 and with an ISO of 100, a correct exposure is indicated at a shutter speed of a 1/125 second (s). If I suggest we use an aperture of f/8, what would the shutter speed now indicate as a correct exposure? If you said 1/500s, you are correct, which also means that you know at f/22 the correct exposure would be a 1/60s and at f/11 1/250s and at f/5.6 your shutter speed would now be 1/1000s. Again, why all the ‘fuss’; what difference does it really make which combinations of apertures and shutter speeds we use as long as the meter indicates a correct exposure?
Knowing that every picture taking opportunity offers you no less than six possible aperture/shutter speed combinations in and of itself may seem immaterial, but when you consider the impact of the creative possibilities influenced by the shutter speed (freezing actions, implying motion or panning) and aperture (a great depth of field, or a background of muted tones and/or out of focus foregrounds) you will have a much greater appreciation for why you are choosing that particular shutter speed and aperture combination. The reason will not be simply because you want to record a correct exposure, but rather because you want each and every time to record the CREATIVELY CORRECT EXPOSURE! The difference between a “correct exposure” and a “creatively correct exposure” is often huge! Let’s take a look!
Let’s pretend we’ve invited ten other photographers to join us in capturing this scene and we break into three groups:
- One third of the group shot this scene at f/11 for four seconds
- Another third shot the scene at a f/8 for a two seconds
- The remaining third shot the scene at f/5.6 for 1 second.
You know what? All of us just shot the exact same correct exposure! Even though each group’s f/stops and shutter speeds were different, the end result was the same; the quantitative value of each group’s exposures are the same. It doesn’t matter if you are photographing with a film-based camera or a digital camera, you must learn and embrace a simple fact; every picture taking opportunity offers you no less then six possible aperture/shutter speed combinations. Why must you know this? Even though each group has the ‘same’ exposure, the motion-filled opportunity that each group captured may look radically different. Knowing that each motion-filled exposure opportunity offers up six possible combinations is a start but knowing which one of two exposures best conveys or capture the motion before is the key. Once you are armed with this knowledge you can begin to fully explore the truly endless road of creatively correct motion-filled exposures!
Now let’s imagine that we all awoke the following morning, once again splitting into three groups and we all head into a flower garden. All of us are armed with our telephoto zooms and we are going to record correct exposures of a single flower bloom.
- One third of the group shoots that lone flower at a correct exposure of f/4 at 1/1000s.
- Another third of the group at f/8 at 1/250s.
- The last third of the group shot that same flower at f/16 at 1/60s.
Fifteen minutes later we all get together and compare results and guess what? Every one of us has recorded the ‘same’ and correct exposure in terms of its quantitative value, but, each group also recorded a visually different yet correct exposure. The visual difference is the key to understanding the difference between a correct exposure and a creatively correct exposure. Although the quantitative value of each exposure was the same, the aperture choices were different and therein lies the visual difference. Depth of field increases each and every time we stop the lens down and in the case of the flower composition, the smaller apertures recorded a greater depth of field than did the aperture of f/4. Again, the exposures taken by all three groups were the same quantitative value but visually they were quite different solely due to the aperture choice.
 Image 1 |  Image 2 |
So to recap: there are six possible aperture and shutter speed combinations that will result in the correct exposure, yet only one, maybe two, is in fact the “creatively correct” exposure. It is that one creatively correct exposure that gives you the precise depth of field you were hoping to achieve or that one creatively correct exposure that gives the the precise action stopping shutter speed or the precise shutter speed that guarantees a motion-filled image, e.g. the cotton candy effect often seen in waterfall compositions.
Let’s take a real world look at just how different a correct exposure is versus that of a “creatively” correct exposure.
Exercise 1: Flower Composition
Head outside with your camera set to 200 ISO and a telephoto lens, say a 200mm, and frame up a flower. Once you focus on the flower, shoot six correct exposures, each one using a different aperture and shutter speed. For example, with the aperture set to f/4, you get a correct exposure indication at 1/1000s. Shoot this one exposure and than move on to f/5.6 and then shoot another at 1/500s, f/8 at 1/250s and another at f/11 at 1/125 second, f/16 at 1/60s and finally another at f/22 at 1/30s. You will soon see that all six exposures are correct in their quantitative value, but radically different in their “visual weight”. Note in just these two examples where the first image was shot at f/5.6 at 1/500 second and the second image shot at f/22 at 1/30s. They are the “same” exposure in their quantitative value, but oh my, look at how much busier the background is in the correct exposure taken at f/22 versus the much cleaner and more isolated flower composition of the correct exposure taken at f/5.6 at 1/500s.
 Image 3 |  Image 4 |  Image 5 |
All three of these images are exactly the same exposure (Images 3, 4, and 5). Their quantitative volume of aperture, (light) and shutter speed (duration of time) is exactly the same, yet you can clearly see that visually they are each different. All three photographs were taken with my tripod mounted Nikon D2X and 200mm Micro-Nikkor lens.
Image 3 was taken at f/5.6 at a 1/500 second, Image 4 was taken at f/11 at 1/125s and Image 5 was taken at f/22 at 1/30s. Again, their quantitative values are identical, which is to say that the volume of light that passed through the lens and the amount of time that light was allowed to render an image on the CCD or film was the same. When I composed all three of these images, they looked exactly the same inside my cameras viewfinder. Yet when I reviewed these same three exposures on the camera’s digital monitor, they were clearly different and that difference in this case was with their backgrounds.
In Image 3, the background is limited to subtle out-of-focus tones, color and very few shapes. In Image 4, the background begins to offer up a bit more information in both shapes and sharper tones and by Image 5, it’s ‘clear’ that the background, consists of other nearby flowers due to the much greater defined shapes and tones that are presented. All three are the same exposure, but as is often the case, only one, and sometimes two, are the “creatively” correct exposure.
Use of Motion
When capturing this simple composition of an S-curve on Interstate 5 approaching downtown Seattle, I was presented with six possible options of recording a correct exposure, three of which you see here (Images 6, 7, and 8). In terms of their ‘quantitative value’, all three of these images are exactly the same exposure, BUT one can clearly see that they are vastly different in their creative exposure, with the creative emphasis on the use of motion. It has and will always be my goal to present motion-filled opportunities in the most motion-filled way and more often than not when there is a motion filled scene, the longer the exposure time, the greater the motion is conveyed. In our first example, Image 6 was captured at f/4 for 1/2s, Image 7 was shot at f/8 for 2s and Image 8 was shot at f/16 for 8s. All three of these exposures were made with my Nikon D2X and Nikkor 200-400mm zoom at the focal length of 400mm, mounted on tripod with my ISO set to 100 and my WB set to Cloudy.
 Image 6 |  Image 7 |  Image 8 |
An exercise such as this is truly eye-opening. The next time you head out the door to shoot city lights at dusk, there won’t be a lot of hesitation on your part about using the slower shutter speeds, since by this example, the slowest shutter speed exposure had the best effect. (I am assuming that you prefer the third image, the image taken at f/22 for 8s and just so there is no confusion, this is not ‘bracketing’ since they are all the same exposure in terms of their quantitative value. I will cover bracketing and other issues related to “where should I take my meter reading” in a future article).
Going to Extremes with Shutter Speed
As you begin to digest more and more this simple rule of exposure, it will soon become clear that the need to pay attention to what aperture choice or shutter speed choice will in fact lead you to conclude that there is but one truly creatively correct exposure most of the time and this is particularly true as you begin to notice that the world offers up an unlimited supply of motion-filled opportunities. When capturing these motion filled opportunities you will find yourself, more often than not, on either end of the shutter speed spectrum; using fast shutter speeds to freeze the action in crisp sharp detail or using slow shutter speeds and the resulting blur to suggest or imply the motion present. There is rarely a ‘middle ground’ when it comes to the motion-filled world and with that in mind, it won’t be long before you discover that most of your time is being spent on action-filled scenes between 1/500s and 1/1000s OR between 1/4s to 8s.
 Image 9 |  Image 10 |
With my camera and 80-400mm Nikkor zoom mounted on tripod and the lens set to 300mm, I captured Image 9 at f/4 and 1/500s. Image 10 was shot at f/22 and 1/15s. Both exposures are exactly the same in terms of quantitative value, BUT quite different in the arena of ‘creative exposure’. Note how at the wide open aperture of f/4 (Image 9) the splash is frozen in crisp sharp detail but at f/22 (Image 10) that same splash is much more ethereal.
Recording a correct exposure will always be your responsibility, so why not make it a point to make the most deliberately and visually compelling ‘creative’ exposure possible!?
Exercise 2: Motion-Filled Exposures
One of the best lessons I know of is one that I have offered up to countless students over the years in my on-location workshops and at my on-line photography school www.ppsop.net. It is a very revealing lesson and not surprisingly will lead you further into the world of creatively correct motion-filled exposures. Choose a moving subject, such as a waterfall or a child on a swing or shoot something as simple as someone pounding a nail into a piece of wood.
With your camera set to Aperture Priority Mode, your ISO set to 100, (or 200 ISO if that is the lowest your camera offers) and your aperture set to wide open, (f/2.8, f/3.5 or f/4) take an image of the action before you. You have just recorded an exposure at the fastest possible shutter speed based on the ISO in use, the light that is falling on your subject and of course your use of the largest lens opening. Now stop the lens down one full stop, (if you started at an aperture of f/2.8 then go to f/4 and if your lens starts with f/4 then go to f/5.6) and once again take another exposure of the action filled subject. Repeat this each time with the aperture set next to f/8, then f/11, then f/16 and finally f/22. Each time you change the aperture by what is called a ‘full stop’, your camera does a quick recalculation and offers up the ‘new’ shutter speed to maintain a correct exposure and since you are stopping the lens down with each full stop change in aperture, (making the hole in the lens half as big as it was before) your shutter speed has now doubled in time to compensate, or in other words, your shutter speed is becoming progressively slower. The slower your shutter speed the more likely it is that your action filled subject before you is showing signs of ‘blurring’, since the shutter speed is too slow to ‘freeze it’.
Conclusion
To re-cap, the fastest possible shutter speed with any given ISO will always be found when you use the largest lens opening and the slowest possible shutter speed (barring the use of any filters) will always be found when you use the smallest lens opening.
There is one thing I hope you will never forget after reading this article: correct exposures can be found just about anywhere, but why settle for just a correct exposure when you can in fact record a truly creatively correct exposure each and every time? You really can take charge of your own creative vision when it comes to exposure!
What Is... Aperture
What Is... Aperture?
When you look at the technical specifications of a digital camera, one of the very first specification mentioned is its maximum aperture and/or its aperture range.
What is 'aperture,' what is a good aperture range, and how is aperture relevant when it comes to choosing a digital camera?
What Is Aperture?
The main function of a camera lens is to collect light. The aperture of a lens is the diameter of the lens opening and is usually controlled by an iris.The larger the diameter of the aperture, the more light reaches the film / image sensor.
Aperture is expressed as F-stop, e.g. F2.8 or f/2.8. The smaller the F-stop number (or f/value), the larger the lens opening (aperture).
[Note: Many camera user manuals today will refer to the aperture in terms of "aperture value" instead of f/value. I'm not sure when this trend started but don't get confused between "aperture" and "aperture value." Aperture value" is simply another way of saying f/value.]
In practice, unless you are dealing with a fixed-aperture lens (many simple point-and-shoot cameras have only one fixed aperture), the aperture of a lens is usually expressed as a range of fstops.
When you read the specifications of a camera, the aperture may be expressed in a number of different ways, the following three being the most common:
- Maximum Aperture:
| F2.8 |
This simply states that the maximum aperture for the lens is F2.8.
- Aperture Range:
| F2.8-F8.0 |
This states the max. and min. aperture, the assumption being that there are standard increments between them.
- Maximum Wide-Angle and Telephoto Apertures:
| F2.8-3.5 or F2.8(W)-F3.5(T) |
This gives the max. aperture for the wide-angle (F2.8) and telephoto (F3.5) focal lengths of a zoom lens.
It is usually not too difficult to figure out that a stated range deals with maximum apertures and not max and min apertures: the mimimum aperture should be quite small at F8, F11, F16 or F22.
A "fast" lens is one that has a large maximum aperture (F2.4, F2.0 for current digital cameras; F1.4, F1.2 for 35mm film cameras).
Quick Quiz: which lens has a larger opening (aperture): one with an aperture of F1.8 or one with an aperture of F2.8?
Answer: F1.8 (remember, the smaller the F-stop, the larger the aperture)
A Good Aperture Range
My personal preference for a 'good' aperture range is:
F1.8 - F16
| F1.8 | F2.8 | F4 | F5.6 | F8 | F11 | F16 |
This tells us that the camera has an aperture range of F1.8 to F16; the maximum aperture is F1.8, and the minimum aperture is F16.
There are 5 f-stops between the max and min aperture. If your camera's lens is currently set at an aperture of F5.6, closing it by 1 f-stop would mean selecting F8; opening it up by 1 f-stop would mean selecting F4.
| F1.8 | F2.8 | F4 | F5.6 | F8 | F11 | F16 |
How Is A Large Maximum Aperture Relevant?
A large maximum aperture is preferable to a smaller one since it gives the photographer more latitude in the kind of pictures that can be taken.
For example, it is pretty obvious that the larger the aperture, the better your digital camera will perform in low-light situations, since a larger lens opening is able to admit more light than a smaller lens opening.
A larger max. aperture also allows you to use a faster shutter speed to freeze action.
So, let's say the light meter in your digital camera calculates that for proper exposure in that indoor arena, you need an aperture of F4 and a shutter speed of 1/60 sec.
| F4 |
| 1/60 |
To use a faster shutter speed (say, 1/250 sec.) to freeze action, you have to open up the aperture to allow more light in for that shorter amount of time.
For every shutter speed increment we go up, we need to open up a f-stop of aperture. From 1/60 sec. to 1/250 sec. there are 2 increments, so we open up the aperture by 2 f-stops, going from F4 to F1.8. Note that the camera would give proper exposure at 1/60 sec. at F4, 1/125 sec. at F2.8, and 1/250 sec. at F1.8, since all three aperture/shutter speed combinations allow the same amount of light into the camera. [Some digital cameras provide a 'Program Shift' function to allow that very shifting of aperture/shutter speed combinations in tandem.]
| F1.8 | F2.8 | F4 | F5.6 | F8 | F11 | F16 |
| 1/250 | 1/125 | 1/60 | 1/30 | 1/15 | 1/8 | 1/4 |
Of course, in a digital camera set on Auto mode, you can select Sports scene mode, and the camera will automotically select a fast shutter speed and the appropriate aperture. Likewise, in Shutter-Priority mode, you can choose which shutter speed you want (fast or slow), and the camera will select the appropriate aperture for proper exposure.
In our example above, let's say the lens on your digital camera only opens up to a max. aperture of F2.8. If you now select 1/250 sec. (in Shutter-Priority mode), the camera will not be able to select an aperture larger than F2.8 (in our example, it really needs F1.8). It would then give you an "underexposure" warning. If you go ahead and take the picture anyway, your picture would be 1 f-stop underexposed (i.e. you really needed to open up the aperture by 1 more f-stop for correct exposure).
Similarly, if you select a shutter speed of 1/4 sec. and the lens only closes down to a min. aperture of F8 (in our example, it really needs F16), the camera would give you an "overexposure" warning. If you go ahead and take a picture anyway, your picture would be 2 f-stops overexposed (i.e. you really needed to close down the aperture by 2 more f-stops for correct exposure).
[Editor's note: There is a third variable in the above example which we have purposefully not introduced. This is the sensitivity of the image sensor -- the ISO. We'll cover this in a later tutorial.]
How Is A Small Minimum Aperture Relevant?
A small minimum aperture is preferable to a larger one since it also gives the photographer more latitude in the kind of pictures that can be taken.
Suppose we want to take a picture of flowing water. As mentioned above, to depict flowing water, we usually want to use a slow shutter speed so that the water blurs. It is this blurring that makes the picture so effective in depicting water motion.
So, let's say the light meter in your digital camera calculates that for proper exposure on a bright sunny day, you need an aperture of F8 and a shutter speed of 1/125 sec.
| F8 |
| 1/125 |
Well, if you decide to use a slower shutter speed (say, 1/30 sec.), this means that you have to compensate by closing down the aperture to allow less light in.
It makes sense really. Since you have increased the time the shutter remains open to allow light in, you must compensate by allowing less light in to expose the image sensor in that longer amount of time, if you still want a properly exposed picture.
But, what if the lens on your digital camera closes to a minimum of F8? You're stuck at the shutter speed of 1/125 sec. If you use 1/30 sec. at F8, your picture will be overexposed, i.e. burnt out. At 1/125 sec. and F8, your picture will be properly exposed but the fast shutter speed will freeze the water motion and you won't obtain the blurring effect you desire.
If the lens in your digital camera closed down to F16, presto, your problem is solved! 1/125 sec. at F8 is equivalent to 1/30 sec. at F16, which means that you would have a perfectly exposed purposefully-blurred-for-effect flowing water shot. [If your lens does not close down to F16, you could use a Neutral Density (ND) filter to reduce the amount of light coming into the lens, and thus allowing you to use a slower shutter speed.]
| F1.8 | F2.8 | F4 | F5.6 | F8 | F11 | F16 |
| 1/2,000 | 1/1,000 | 1/500 | 1/250 | 1/125 | 1/60 | 1/30 |
[Editor's note: There is a third variable in the above example which we have purposefully not introduced. This is the sensitivity of the image sensor -- the ISO. We'll cover this in a later tutorial.]
Aperture and Depth of Field (DOF)
We mentioned this above but feel it is important enough to repeat in its own paragraph.
The Depth of Field is the distance wherein objects are in focus.
There are times when you desire a great depth of field, i.e. where objects both close to you and far from you are in focus. This is especially true when you are taking a landscape picture and want as much as possible to be in crisp focus.
Then there are times when you want to isolate your subject, as when you are taking a portrait and want your subject to be in sharp focus but the background to be out of focus. In this case, you desire a shallow depth of field.
One way to influence DOF is by selecting the appropriate aperture.
The rule of thumb is this:
- Select a large aperture (or small f/value or small aperture value), e.g. f/2.8, to obtain a shallow DOF
- Select a small aperture (or large f/value or large aperture value), e.g. f/8.0, to achieve great DOF
Here are some real images that demonstrate the use of aperture to influence DOF:
| Aperture and Depth of Field (DOF) AF area is on yellow pistils of flower in front | |
| Shallow DOF | Great DOF |
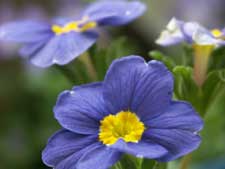 | 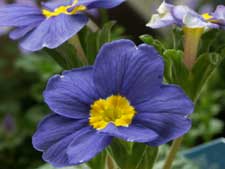 |
| Note how the use of a large aperture (small aperture value) throws the flowers in the background out of focus. Focus has to be precise. | Using a small aperture (large aperture value) extends the DOF from the foreground all the way to the background. |
| 49.8 mm, Av, Spot, 1/30 sec., f/3.5, +0.7EV, Macro, Tripod used | 49.6mm, Av, Spot, 1/5 sec., f/11, +0.7EV, Macro, Tripod used |
Note: Since we are on the subject of DOF, DOF also changes with focal length. Use a small focal length to increase DOF, a longer focal length obtain a shallower DOF. I.E. if you zoom, the DOF decreases. [OK, to be technically correct, focal length does not really affect DOF, but gives the effect that it does. And, that's good enough for us since that's what we're after. We'll cover DOF in a later tutorial.]
Due to the small image sensors used, digital cameras use such small focal lengths that it is very difficult to obtain shallow depth of field even when using a large aperture. In the example above, we used a large aperture AND a long focal length (telephoto macro) to achieve a shallow DOF.
Recap
A large maximum aperture is a good thing. It allows more light to reach the image sensor, and so allows you to use a faster shutter speed. A faster shutter speed freezes action and negates the effect of camera shake, resulting in pictures that are not blurred.
Another advantage of a large maximum aperture is to provide a shallow depth of field. This allows the background to blur nicely thus isolating your subject (especially effective when taking portraits).
A small minimum aperture is also a good thing. It allows you to use a slow shutter speed on a bright sunny day. A slow shutter speed allows you to depict motion.
Another advantage of a small minimum aperture is to increase the depth-of-field. An increased depth-of-field allows you to take landscape pictures where as much of the picture in the foreground and reaching all the way to the background (usually, 'infinity') is in sharp focus.
What is lens aperture in digital cameras?
There is no difference between the aperture in a film camera or in a digital camera.
The aperture is the diameter of the adjustable iris that controls the amount of light passing through the lens and onto the film plane or digital sensor. An aperture is expressed as an f-stop, which is equal to Focal_Length / Aperture_Diameter, and is written: f/number.
For example, if a lens has a focal length of 50mm - the 'normal' 35mm film camera lens - and the aperture diameter is 5mm, then the f-stop is 50/5 or f/10.
If you know what f-stop a lens is set to, you can determine the physical diameter of the aperture. For example, with an aperture of f/11:
- On a 50mm lens, the aperture is 4.55mm in diameter (50/11).
- On a 100mm lens, the aperture is 9.09mm in diameter (100/11).
- On a 20mm lens, the aperture is 1.82mm in diameter (20/11).
F-stops are used because they are a standard way to express the amount of light passing through a lens. The amount of lens passing through a 50mm lens set to an aperture of f/11 is the same as the amount of light passing through a 300mm lens set to f/11. This is far simpler than measuring the diameter of the aperture to calculate relative levels of illumination..
Difference between setting aperture by lens and camera
The "choice of focus" is a choice for the focus spot. With a bigger aperture (lower F number), the focus point gets more and more isolated and everything else is more and more blurred. This effect generally works better, the bigger the sensor is. That is why you don't really see this effect on point and shoot cameras; small aperture and small chip.
But that is really putting it way too simple. You will see what I mean when you get the cam and a nice bright lens.
Some lenses, especially the older ones, have an aperture ring. With most of these, you have to set the aperture on the lens; if you change it on the camera's dial it won't on the lens. With automatic lenses, which do not have an aperture ring, the number set in-camera will be electronically transmitted to the lens and then set.
Your camera has 4 "Exposure Modes" : "P" for Program, "M" for Manual, "S" for Shutter Priority and "A" for Aperture Priority.
In "P" your camera will select an aperture and shutter speed to give a correct exposure.
In "M" you can set the aperture and shutter speed any way you want.
In "S" you select a shutter speed and the camera will select a correct aperture.
In "A" you select an aperture and the camera will select a correct shutter speed.
Using "P" turns your DSLR into a glorified "point & shoot" since you have no control over the settings the camera chooses.
If you're shooting night scenes without flash then you'd use "M" so you can select both shutter speed and aperture to achieve the results you want. This requires a tripod to mount your camera on since shutter speeds are usually long - 2 seconds or more.
If you're shooting action - kids running and playing, sports or other fast moving subjects - then you'd choose "S" so you can keep the shutter speed high enough to stop the action.
If you're shooting nature or scenics you'd choose "A" since you'll want to control your aperture to give more or less Depth of Field (DOF)*. You must remember to check the shutter speed the camera selects to make sure it isn't too slow to hand-hold the camera.
A company called "The Magic Lantern" offers an instructional DVD for your camera. You should be able to find it at Circuit City or Amazon. It would, IMO, be very helpful.
Actual classes in photography would be the very best way to learn if any are available.
You might want to visit http://www.fotosharp.com and buy their "Day & Night Exposure Guide" if you plan on doing low-light, non-flash photography.
* DOF is loosely defined as the area in acceptable focus in front of and behind your subject. If you google "depth of field" you'll find numerous examples and discussions. If you go to http://www.expoimaging.net you can read about their ExpoAperture2. This is a circular chart showing the DOF for different focal lengths, apertures and sensor sizes.
There is no difference between the aperture in a film camera or in a digital camera. The aperture is the diameter of the adjustable iris that controls the amount of light passing through the lens and onto the film plane or digital sensor. An aperture is expressed as an f-stop, which is equal to Focal_Length / Aperture_Diameter, and is written: f/number. For example, if a lens has a focal length of 50mm - the 'normal' 35mm film camera lens - and the aperture diameter is 5mm, then the f-stop is 50/5 or f/10. If you know what f-stop a lens is set to, you can determine the physical diameter of the aperture. For example, with an aperture of f/11: - On a 50mm lens, the aperture is 4.55mm in diameter (50/11). - On a 100mm lens, the aperture is 9.09mm in diameter (100/11). - On a 20mm lens, the aperture is 1.82mm in diameter (20/11). F-stops are used because they are a standard way to express the amount of light passing through a lens. The amount of lens passing through a 50mm lens set to an aperture of f/11 is the same as the amount of light passing through a 300mm lens set to f/11. This is far simpler than measuring the diameter of the aperture to calculate relative levels of illumination.. |
| |
Subscribe to:
Posts (Atom)
