Thursday 26 February 2009

Night Photography

DSLR camera settings and tips for taking city landscapes at night

One of the reasons enthusiasts purchase SLR digital cameras, is to take night photographs in and around the city without them resulting in blurred or shaky images. However, as you'll soon find out, it's not as easy as setting your digital camera to automatic and shooting the image. Listed below are tips that will help you take city landscape photographs after dark.

Digital SLR settings for night photography

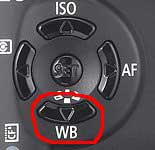
  1. Set your camera to shutter priority. On a Canon DSLR you turn the top dial to TV. Whereas on some SLR models, like the Nikon D40 for example, shutter priority is displayed as the letter S. If your camera doesn't have TV or S then refer to your camera manual.

    shutter priority Nikon D40 shutter priority on Canon DSLR


  2. If you have a tripod handy, set the ISO to the lowest setting your camera will go. For example, Canon EOS 400D will go as low as 100 ISO, whereas a Nikon D40 will go to 200. If you don't have a tripod, look for something you can rest your camera on. For example a stone or brick wall.

    If you absolutely need to hand hold your camera, the only choice of SLR settings you have for night photography is to set it to P (Program) and up the ISO to 800 - 1600. You can then skip over step 3 below. Note: This usually isn't recommended for high quality night shots.

  3. For high quality night shots, the shutter needs to be set at a slow speed. This allows the camera enough time to let light in to the sensor, without increasing your ISO setting. How slow depends on the time of night and how dark it is. There is no set shutter speed to suit every situation. However I've found if you take one photograph at 10 seconds, one at 20 and one at 30. Then view the image on your LCD display and see which one shows the most light. From there you will be able to judge how slow the shutter speed needs to be for the rest of your photo's on that particular night.

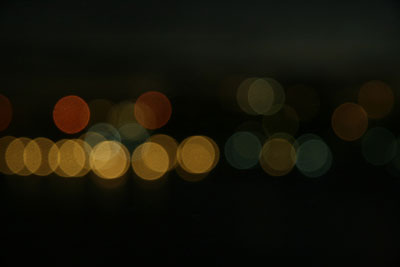
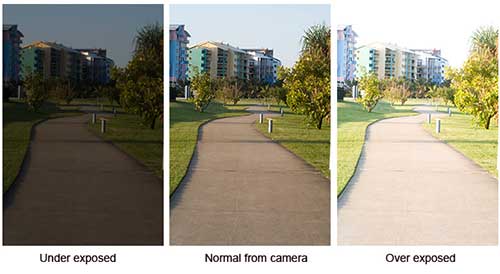
    The mistake many photographers do, is to set their shutter speed too fast. For example the night shot below was taken with a one second shutter. As you can see, this wasn't long enough to allow the light in to the camera's sensor.

    example of one second shutter speed at night

    I recognised this instantly and reshot the photograph using a slower shutter speed of 15 seconds. This time the SLR camera was given more time to allow the light in to the sensor, resulting in a clearly focused night shot that you can see below.


    example of night shot 15 second shutter speed

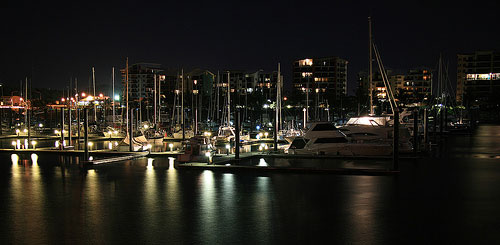
    Mackay Harbour Marina Australia

    Camera: Canon EOS 400D / Rebel XTi
    Lens: Canon EF-S17-85mm f/4-5.6 IS USM
    Exposure: 15 sec (15)
    Aperture: f/5
    Focal Length: 33 mm
    ISO Speed: 100
    Exposure Program: Shutter priority
    Flash: Flash did not fire

    Why this night shot worked

    The shutter speed was set to a slow 15 seconds. Therefore I was able to keep the ISO set to a high quality 100. Of course shooting at such a slow speed also required a sturdy tripod. You won't be able to hand hold a digital camera for 15 seconds without shaking.

    If you don't have a tripod handy, the other option is to up the ISO to 800 or 1600, then keep the shutter speed fast. However, the quality of the night shot will be grainy or noisy, and is usually not recommended.


    Here is another example of a night photograph, this time the shutter speed is 30 seconds.
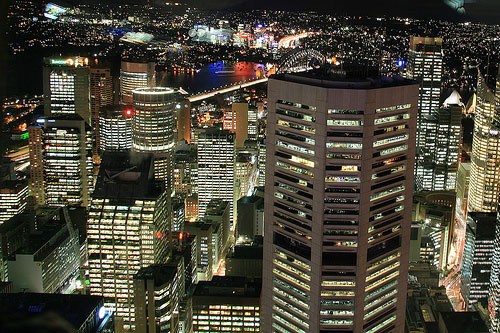

    30 second shutter speed night shot

    Sydney Australia

    Camera: Canon EOS 400D / Rebel XTi
    Lens: Canon EF-S17-85mm f/4-5.6 IS USM
    Exposure: 30 sec (30)
    Aperture: f/7.1
    Focal Length: 17mm
    ISO Speed: 100
    Exposure Program: Shutter priority
    Flash: Flash did not fire

    Why this night shot worked

    The ISO was kept to a high image quality 100, while the shutter speed set to a slow 30 seconds. The night photograph was taken from a 260 meter-high Sydney Lookout Tower where tripods were forbidden. Therefore I sat my SLR camera on a binocular stand.


Where to focus for night photography?

A frequently asked question beginners often ask is, where should they focus for night shots. Personally, I get better results if I focus on a far object in the distance. This should ensure your camera automatically sets the aperture to capture the whole scene in focus and not just closer objects.

Tuesday 24 February 2009

Manual mode setting

Tips for manual mode camera settings

Using your DSLR camera in fully manual mode (M on the top dial), isn't as hard as it first seems. Whether you own a Canon, Nikon, or any other SLR camera brand, using manual mode works basically the same.

Advantages of fully manual

  • Manual mode allows you to set both your aperture and shutter speed separately, without the camera automatically changing the other to suit. With this in mind, you can be more creative with your shots. For example, you can photograph a beach landscape keeping the aperture high (for example f/22) so everything is in focus, yet at the same time set a slow shutter speed to create dreamy, slow motion waves.


    example of photograph taken in full manual settings

    Example of photograph taken in fully manual settings

    Camera: Canon EOS 400D / Rebel XTi
    Lens: Canon EF-S17-85mm f/4-5.6 IS USM
    Exposure: 0.2 sec (1/5)
    Aperture: f/22
    Focal Length: 85 mm
    ISO Speed: 100
    Exposure Program: Manual
    Flash: Flash did not fire

    Why this shot worked

    For this beach landscape, I wanted the whole scene from the sand in the foreground, to the island and boat in the background to be fully in focus. I also intended for the ocean waves to have a slow motion dreamy look and feel to them. For this to be achieved, the camera needed to be set on a high aperture f/22, and a relatively slow shutter speed of 1/5th of a second. If I had set the camera to aperture priority, then the shutter speed would have been automatically created for me, or conversely if I'd set shutter priority, the camera would have automatically set the aperture to suit. Therefore, setting the camera on manual mode, allowed me to fully choose both the aperture and the shutter speed.


  • Manual mode gives you full control over your exposure. If you are finding a lot of your photographs are either underexposed (too dark) or overexposed (too light) then working in fully manual mode will help you to better understand and correct these exposure problems. Personally, I've found tweaking exposure results in photographs that are much more colorful than those taken in other modes.

How to use manual mode?

  • Firstly set your camera's top dial to the M mode and turn it on.

    Example of manual mode:
    manual mode example


  • To set the shutter speed, turn the rotating dial that looks like this:

    example of rotating dial


  • To set the aperture (f/number), press and hold down the exposure compensation button while turning the rotating dial.

    The exposure compensation button looks like this:

    example of exposure compensation button


  • To set the exposure, look through your viewfinder and press the shutter button half way down to focus on an object or scenery. You will then notice at the bottom of the screen what is referred to as a light meter, that looks similar to this:


    For this example, turn the rotating dial again until this exposure line shows 0 exposure. That is, it is neither on the right or left side, but rather set in the middle. If you don't like looking through the viewfinder, you should also be able to see this exposure line on the back LCD display. Take the shot and you'll find a well balanced exposure.

Other tips and hints for using your SLR camera in manual mode

  • You will notice when you change the exposure level as demonstrated in the last tip, the shutter speed also changed to suit that particular exposure. You can however set the camera so it's the aperture that changes to suit the required exposure instead. To do this, press the exposure compensation button example of exposure compensation button down while turning the rotator to the correct exposure. This way it will be the aperture that is changed and not the shutter speed.

    Therefore, before setting the correct exposure, it's important that you ask yourself which setting is more important to keep for your specific shot. Is the aperture more important or the shutter speed? If you're shooting a landscape, then I recommend keeping the aperture (f/number) as you had originally set it to. If you are photographing a moving object like a bird for example, then I recommend keeping the shutter speed setting.

Online Photography Course

One of the most important steps for taking photographs in manual (M mode), is understanding how to achieve a good exposure.

Assignment: Step by step lesson to help you fully understand manual mode exposure
  • Change your camera setting to manual (M) mode and turn it on.
  • Press and hold down the exposure compensation button example of exposure compensation button while turning the rotating dial until the aperture is the lowest f number it can go. You will be able to see this on the back LCD display. For example:


    Note: The only reason I've instructed you to change to a low F number is to ensure the image is taken quickly, even if shot inside.

  • Look through your viewfinder and point your camera at a nearby object or person. Press the shutter button half way down to focus, then lift up again. Don't yet take the shot.

  • Still looking through your viewfinder, look for the exposure line along the bottom. Turn the rotating dial until that exposure line is set directly in the middle (on 0).


  • Now take the photograph. This should result in an image that is not too underexposed and not too overexposed. If you find the camera took too long to shoot the photograph, increase your ISO to 400 or 800 and try again.

  • Repeat the lesson again, this time going outside and taking an image of your street. However, for this example, firstly set the aperture to f/11. This will ensure everything is in focus.

  • While your taking photographs of your street, try setting the exposure off center. You'll notice a few notches to the right and left of middle, will result in over and under exposure (too light or too dark).
This lesson helps demonstrate the importance of the exposure line when photographing in manual mode.

White Balance

What is white balance?

Setting the correct white balance in your camera, is important to ensure the objects that are white, are actually displayed white within the photograph. As you can see by the interactive example below, white balance also effects other colors as well. If your camera's automatic white balance setting doesn't get the color 'white' correct, it won't render the other colors correctly either.

Click within the square below to start the demonstration. Then click each of the four white balance settings to see how color is effected by this setting.


How to know if the wrong white balance has been set?

Just about every photographer at one stage or another, has taken a photograph that contained a blueish tinge. The blueish tinge is normally a result of using an incorrect white balance. For example, the first image below has a blueish tinge, where as the second shot displays a more natural coloring.

example of blue tinge due to incorrect white balance

natural colors due to correct white balance

Setting an incorrect white balance, can also result in unsightly reds, yellow or green tinges as well, depending on the situation.

Doesn't auto white balance fix this problem?

Not always. While it's true many improvements have been made in todays digital camera's, they still often get white balance settings wrong in certain lighting conditions. If you take your images in RAW format (highly recommended) then sure, go ahead and use auto white balance. If the camera gets it wrong, you can always change this setting later on in your RAW editor.

Where to find your camera's white balance settings?

For Canon users, the camera's white balance setting can be found on the back panel next to the LCD screen (on Canon 400D). It can be recognised by the letters WB, as demonstrated in the image below. There can be slight differences between models, so if you can't see the letters WB, then check with your camera's manual. Press the WB button and you'll be given a list of the following options: auto, daylight, shade, cloudy, tungsten light, white fluorescent light, flash and custom.

For Nikon users, press the menu button on the back near the LCD screen, and navigate your way to the 'Shooting Menu'. From there, you'll be able to choose 'White Balance'. Once you're in the white balance screen you'll have several options including: auto, incandescent, tungsten, fluorescent, direct sunlight, flash, cloudy, shade and preset.

example of Nikon D40 shooting menu

Note: If you have the camera set on fully automatic, you won't be able to choose a white balance setting.

Quick explaination of each white balance setting

Note once again, settings differ between brands and models. Therefore don't worry if you have a few of them missing from your menu bar.

When to use Auto white balance: In auto, the camera guesses what white balance to use depending on the available light. In 95% of the time, the guess results in a nicely colored photograph. This is a perfect setting for times when you're unsure what white balance to choose. It's also a good idea to keep the camera on Auto white balance if you shoot in RAW format (recommended).

Daylight (Canon) and Direct Sunlight (Nikon): This is a good setting for direct sunlight. For example, a beach landscape mid morning where you're not shooting into shade.

When to use Shade white balance: Use shade white balance in shady area's or sunset shots. It will help give a warmer color to your shots.

When to use Cloudy: This is a good setting for cloudy days. It's also quite effective for shady area's as well. I've found there is a fine line between shade and cloudy white balance settings.

When to use Tungsten white balance: This is one of the most extreme balance settings of them all and should only be used with tungsten light bulbs. Or at times where you purposefully want a blue tinge to your images.

When to use fluorescent: This setting will help make inside flourescent house lighting, look a bit better than the yellowy orange color you usually see.

Flash white balance: Flash white balance is used mostly for studio work.

Custom (Canon) and Preset (Nikon) white balance settings: Use these ones with a white or grey card that you can pick up cheaply from any camera store, for perfect white balance

Exposure tips

How to manually change your camera's exposure settings?

Many beginners often find their photographs are either underexposed (too dark) or overexposed (too light or white). However, there is a way to manually change the exposure to compensate for them being darker or lighter. Getting the correct exposure balance isn't as hard as it first seems, once you learn a few simple skills from the tips listed below.

Where is the exposure compensation button?

On both Nikon and Canon digital SLR camera's, the exposure compensation button looks like a plus and minus sign (+/-). On a Nikon D40, this is situated near the shutter button. For Canon 400D it is found upper right to the LCD screen on the back of the camera.

Example of exposure compensation button: exposure compensation button

How to use the exposure compensation button?

  • The exposure compensation button can be used when your camera is in any non-automatic mode. For example, you can use it while your top dial is on P (for program), S (Nikon shutter priority), TV (Canon shutter priority), A or AV (aperture priority) and M (fully manual) modes.

  • For this exercise, put your camera on the P mode and take one photograph. Now take a second photograph, this time firstly pressing the shutter button half way down to focus (lift up again), then hold down the +/- compensation button, while turning the main dial to the right 4 stops and shoot. Now look at both images one after another in the LCD screen and you should notice a difference in the lighting.

    Shown below is an example of what the main dial looks like:
    example of main dial


    Now repeat this exercise, this time when taking the 2nd photograph, hold down the compensation button down and turn the main dial 4 stops to the left. Note: it won't need to always be 4 stops, this is an example to show extremes only.

    What you should be seeing is a series of photographs, one too dark, one just right and one too light, like the example below:


examples of different camera exposures

  • If you own a Nikon SLR camera, turning the main dial to the left (while holding down the exposure compensation button) will lighten the image. Whereas turning it to the right will darken the image for the next shot taken. You need to readjust it for each photograph.

    If you own a Canon SLR camera, it is the opposite to the Nikon. Turning your main dial to the left (while holding down the exposure compensation button) will darken the image and turning it to the right will lighten the image.

When is exposure compensation useful?

  • If at first, you take an image and it looks to be too dark or too light when viewing it in your LCD screen. For example if it is early morning or late evening, you might want the photograph to appear lighter (or darker) than it actually is.

  • If you are taking a photograph of an object that is in actual fact too dark, and you want to lighten it. For example if you were taking an image of the underside of a car near the tyre. Bad example I know :) Or lets say you want to photograph a black bird and need to see the actual eye in your image. In this case you could slightly over expose the image to bring out the patterns and shapes.

  • In contrast, snow images can appear too over exposed. In these situations it's recommended to underexpose the image until you see a nice balance between the sky and the snow.

  • Exposure compensation is also useful for those people that photograph objects in a light tent. A light tent is a square box that has numerous colored backgrounds so photographers can capture products and objects with one background color. For example, if a white background is used and you don't change the exposure compensation, the background may appear off white.

imple green rule for exposing shots taken near nature

Whenever you take a photograph in or around nature, it's useful to expose on any part of the scene that is green, then underexpose it by two thirds.

For example, for the photograph below, the exposure was taken from the green leaves to the left of the flowers. I then underexposed the shot by 2/3, refocused on the flower and took the shot. As the camera was set on manual, the shutter speed (exposure) stayed as it was when exposed on the green leaves. Usually when you refocus on the subject you want to take a photo of, the camera will tell you the exposure is wrong. Ignore this and take the shot anyway. In most cases, it will result in a nicely exposed, detailed photograph.

If you're not sure what I am referring to by 'setting the exposure', you can find a good article on this at: Advantages of manual settings.

Note, this exposure tip will also work when you have your camera set on shutter priority. However, it won't work for automatic modes (such as landscape, portrait) or aperture priority, as the camera then sets the shutter speed for you.


example of image exposed on the color green

Exposing Flower Gardens

Camera: Canon EOS 400D / Rebel XTi
Lens: Canon EF 100mm f/2.8 Macro
Shutter Speed (exposure): 0.005 sec (1/200)
Aperture: f/11
Focal Length: 100mm
ISO Speed: 200
Exposure Program: manual

Tip for exposure

The camera was set on manual mode with an aperture of f/11. I focused on the green leaves that had similar light falling on them as the flowers and underexposed by two third's. Next I focused on the purple flower and took the shot (without re-exposing). As you can see, this resulted in beautifully colored photo with a nice balance between light and shade.


example of image exposed on the color green

Exposure tip for black subjects like birds

Camera: Canon EOS 400D / Rebel XTi
Lens: Canon EF 70-300mm f/4-5.6 IS USM
Shutter Speed (exposure): 0.002 sec (1/500)
Aperture: f/5.6
Focal Length: 300mm
ISO Speed: 400
Exposure Program: manual

Tip for exposure

Taking the exposure on something that is green, is particularly useful in times where the subject is black. If the shot above was exposed on the black bird, the details on the feathers and the green eye would have been lost. Instead, the photographer took the exposure on the nearby grass and then underexposed it by 2/3'rds.

Another time this exposure tip was useful, was during an outside photo shoot of my son. The first shot I'd taken was exposed on my son's face. Looking back on the LCD screen, I'd found there was a dark shadow over one side of his face. The shot was taken again, this time exposing (-2/3) on the green grass next to him. This helped to eliminate the shadow on his face.

Related Articles:

Monday 23 February 2009

Micro Photo

What is the difference between macro, micro and closeup photography?

macro ladybug photograph
There is often much confusion amongst new photographers over the terms macro, micro and close up photography and how they differ. For starters, macro and micro usually refers to the same thing, in that Nikon names their range of 'macro lenses' with the word 'micro'. Canon on the other hand, calls them macro lenses.

For example, Nikons top macro lens is called AF-S VR Micro-Nikkor 105mm f/2.8G IF-ED lens. Notice the term micro in that name.

Now for comparisons sake, Canon's top macro lens is called a Canon EF 100mm f/2.8 macro lens. This time, instead of seeing the term micro, you'll notice the term macro within the lens name.


What does macro and micro refer to when it comes to photography?

The word macro means big, whereas the word micro mean small. So how is it that these two terms related?

If the subject you are photographing is small and you want to make it look big, you end up with a "macro" view of a "micro" subject.


What is macro (micro) photography?

Macro photography is that which is taken with a dedicated macro lens. A real macro lens has the capability of achieving in the least a 1:1 magnification. Just because a camera has the word macro written on it, doesn't make it a true macro lens. Both the Nikon and Canon lenses mentioned above, are considered real macro lenses. If you're not sure how to recognise a real macro lens, you may find an earlier article useful called, What is a real macro lens.


What is close up photography?

Close up photography, is the act of photographing objects such as flowers or insects in close range so the subject you are photographing fills the frame. In other words, it's the act of photographing subjects close up. This is easily achievable with any lens, even a 300mm telephoto lens.

Macro photography is in essence close up photography as well. However, close up photography is not always considered as true macro photography. For example, if you have a lens that is NOT considered a real macro lens, yet offers a macro setting (as many do nowadays), this is usually refered to as being close up photography, and not true macro.


How to recognise the difference between macro and close up photography?

Capturing the finest detail, is one of the main differences between macro / micro photography and close up photography.

Macro lenses are expensive for a reason. That being, a true macro lens allows the photographer to capture finer detail than would otherwise have been seen. For example, the hairs on an insects face, or the pattern in its eye.

Take the two photographs below for example. The first image is a very good example of a close up photograph, taken with a Nikon telephoto lens. While the second photograph is a macro shot, allowing for bigger magnification and showing the finest detail.

example of a close up photograph

example of a macro photograph of a dragonfly

Link (click here)


Is your camera a macro lens if it has macro written on it?

Just because your camera lens has macro written on it, doesn't mean it is actually macro. Unfortunately manufacturers sometimes add this word to their lenses as a marketing ploy. Yes, it is true they can focus closer than an ordinary lens. However, don't expect them to get as close as a true macro.


macro dragonfly

Blue Dragonfly

Camera: Canon EOS 400D / Rebel XTi
Lens: Canon EF 100mm f/2.8 Macro
Exposure Program: Shutter priority
Exposure: 0.003 sec (1/400)
Aperture: f/3.2
Focal Length: 100 mm
ISO Speed: 200

Why this image works

This macro shot worked well in bringing out a comical side to the dragonfly. This helped to create a lot of interest in photo sharing sites like Flickr.


How to recognise a real macro lens

A real macro lens has the capability of achieving in the least a 1:1 magnification. This should be written either on the lens or in the manual under specifications. Note: the aperture f stop is not the ratio we are talking about here. For example, the macro lens used to photograph the dragonfly above has an aperture of f2.8. However it also has a 1:1 magnification rating, making it a true macro lens.

Technically, this ratio is a measure of how large the subject appears on your camera's sensor. A lens with a magnification of 1:1 means the subject appears as life size on the sensor. A macro lens with a 2:1 ratio captures subjects twice as large as they appear in real life. On the other hand for a 1:2 lens, the subject appears on the sensor as half its actual size. Therefore a 1:2 lens is not considered a real macro lens.

  • 1:1 or 2:1 ratio is a real macro lens
  • 1:2 is not a real macro lens


example of macro insect

Orange Dragonfly
(click the image to see a larger version)

Camera: Canon EOS 400D / Rebel XTi
Lens: Canon EF 100mm f/2.8 Macro
Exposure Program: Shutter priority
Exposure: 0.002 sec (1/500)
Aperture: f/5.6
Focal Length: 100 mm
ISO Speed: 200

Why this image works

Photographing the dragonfly side on allowed me to achieve full focus in the body from head to tail. Macro lenses have a shallow depth of field. This usually makes it hard to have an insect fully focused. For example, if I had taken this photograph head on and focussed on it's eyes, any body part closer or further away from the eyes, would have been out of focus and blurred. Just as it's wings are in this particular image.


Link : Click here

Sunday 22 February 2009

Nuetral Density Filter

A few days ago I was shooting when someone passing by stopped to ask me “what are all these pieces of glass you put in front of the lens?” ” ((”This is a translated version of the question” ))” so this got me thinking that maybe some of adidap’s readers are not familiar with filters either! So today I will be writing about Neutral Density Filters, aka ND Filters, not to be confused with Graduated Neutral Density filters, or ND Grad filters ” ((”I will write about those later”))”.

Why are they called Neutral?

Neutral Density filter are, in essence, just grey filters used to reduce the amount of light passing through the lens and hitting your camera’s sensor/film. So, in short, we use them in photography the same way you would wear sunglasses in real life!
They are said to be Neutral because they do not affect the colors in the resulting pictures, they filter out all colors equally.

Why use Neutral Density filters?

Since ND filters will result in less light they can affect our exposure in 2 drastic ways

  1. A wider aperture: Assuming a fixed shutter speed, less light would mean wider apertures to yield the same exposure
  2. A slower shutter: Assuming a fixed aperture, less light should be, in this case, compensated by a longer exposure time or slower shutter speed

When to use Neutral Density filters?

Building on the two scenarios we have just discussed ND filter can be very helpful in case you need

  1. A shallower Depth Of Field: Suppose you are shooting in broad daylight a portrait and you want a shallow DOF to isolate you subject. Depending on the camera you are using, you might quickly be limited by the maximum shutter speed you can set. A Neutral Density filter will allow you to reach bigger apertures for that same maximum shutter speed.
  2. Early fall

    A slower shutter speed: A typical example is if you are shooting waterfalls!
    We all like to capture that milky water effect but, to get it, you need somehow slow shutter speeds. Speeds that it is not possible to have on a sunny or even light overcast day. Here too ND filters are our friends eating up that extra light and allowing us to dial down to the speeds we want

When NOT to use Neutral Density Filters

I won’t go over the obvious million of situations when you do not want to use ND filers, however I want to pin point that ND filters should be used only when you want to equally reduce light passing through your lens in all the scene you are photographing. That is why, in the beginning of this post, I told you they should not be confused with ND Grad filters. ND filters are NOT useful if you are shooting scenes in which different objects are lit differently and you need to expose all of them correctly.

Understanding Neutral Density Filters

ND filters have “gradings” depending on the amount of light they cut. A higher grading means that the filter will filter more light allowing you wider apertures or slower shutter speeds.

They come, AFAIK, in 2 types of notations

  • 0.3 0.6 0.9 ND: The number here designates the density of the filter. Every 0.3 will make you lose one stop of light. So a 0.3ND will cut 1 stop of light 0.6 2 stops etc…
  • ND2 ND4 ND8: Another notation for the same logic. The notation here is based on binary numbers 2=21 i.e 1 stop of light. 4=22 i.e. 2 stop of light etc…


Saturday 21 February 2009

Polarise filter

 - Polarizing Filters -


Q1: What does a polarizing filter do?

A1: In order to answer this question, you'll first have to know something about
light. Light can be regarded as a flow of particles (called photons), or as
an electromagnetic wave. I'll try to stick to the wave theory. So, light
can be regarded as a waveform, oscillating in an arbitrary direction
perpendicular to its direction of motion. There will be waves oscillating
up/down, oscillating left/right and all that's in between those two.
A polaroid filter only allows to pass the component of the oscillation that
is directed in the polarizing direction of the filter.
So only the waves that are oscillating in the polarizing direction can pass
the filter unattenuated. All other waves will attenuate according to the
formula:

Amplitude after polarizing = Amplitude before polarizing * cos (theta),

where theta is the angle between the oscillating direction of the wave and
the polarizing direction of the filter.
The overall effect is blocking out half of the available light, and
'directing' the other half.


Q2: What is the difference between a linear and a circular polarizer?

A2: The main points are:

(1) If you use a standard linear polarizer with cameras that use auto-focus
and/or auto-exposure, you may have problems.
This filter may also cause trouble with manual cameras, if you're using
TTL light measurement. A little dependent on the camera, your meter
might go crazy.
(It is not said you _will_ get problems, only that you might get them.)


Filter

- UV/Skylight Filters -


Q1: What does an UV or skylight filter do?

A1: Both of the filters filter out the UV light that can cause a blueish haze
on your pictures, since normal film is not only sensitive to visible light,
but also to UV.
A skylight filter is also slightly coloured (pink or yellow), to give your
pictures a 'warm' appearance (not so much blue).


Q2: What is the difference between a normal UV and a skylight filter?

A2: As mentioned above, the skylight filter is slightly coloured to give your
pictures a 'warm' appearance.


Q3: In what situation do I use an UV filter?

A3: UV and skylight filters are useful when you are taking pictures in the
mountains or at sea or any other place where there is a lot of UV light.
It will filter out the blue haze that normally blurres the background of
your picture. It is also very useful when taking pictures in the snow,
since snow is a very good UV reflector.


Q4: Can I always leave the UV filter on the lens?

A4: About half of all the photographers keep an UV filter on their lens perma-
nently, for it prevents your lens against dust, scratches and perhaps
damage due to accidentally dropping the lens. A filter is much cheaper than
a lens, so ruining your filter will not be as bad as ruining the front part
of your lens.
On the other hand, some photograpers (the other half) think it unneccesary
to keep the filter on the lens, since everything between the original
picture and your film, including filters, can cause blurrs or errors in the
image, and that's one of the things we don't want to happen.
It is just a matter of personal preference. I must admit I always have a
filter on my lens, and I take it off only for cleaning.


Q5: What effect does an UV or skylight filter have on taking pictures?

A5: First of all, it will filter out most of the UV light. A skylight filter
will also colour your pictures a little. Because the UV is filtered out,
you may notice the sky in your pictures is not as deep blue as it used to
be. This is because the UV component is now missing, resulting in another
kind of blue on your pictures. Just try a few piCreatectures with and without
filter and see what you like best.
An UV or Skylight filter doesn't have any effect on the amount of visible
light falling through the lens, so you won't have to correct for it.


Good LInk

1) Choosing camera lens filter

2) Different between UV filter and UV polarizer

3) Photographers Guide to Essential Field Techniques

4) SLR Photography guide

Monday 16 February 2009

Using Camera Flash

Flash Photography

There is probably no type of photography that is more disappointing to the beginner than flash photography. Unlike natural-light photography, where what you see can often be what you get, it is difficult to visualize what the effects of using flash will be. Flash is shut off until the moment of exposure, and then its illumination is too brief to visually evaluate what it does to your picture.

The real learning process occurs over time, with trial and error. You should not expect to become an instant expert at flash photography, but persistence and observation (constantly comparing your pictures with earlier ones, and identifying not only the problems to overcome, but the successes you have achieved) will give you the experience you need to control flash and produce consistently-good flash pictures.
Generally, poor lighting conditions results in poor pictures. Usually you don’t need flash for normal daytime outdoor shots unless it's very gloomy. Keep in mind that flash has a very limited range so it should only be used when the subject is fairly close. Use fill flash to help lighten up a subject which in deep shadow.

It is best to avoid using flash indoors unless absolutely necessary: it tends to “burn out” subjects and can create harsh shadows. A better choice is to bounce the flash off the ceiling if your camera and flash support this option.

Another option is to let as much daylight in as possible and, turn on all of the lights. You have the option of using fill flash when there's enough light in the scene but your subject isn't well lit.

Under certain circumstances you might want to turn the flash off and let the camera deal with the low light condition by increasing exposure. This won't work in very dim conditions, but can give better results than flash. Be sure to guard against camera shake.

Digital cameras are less sensitive to light than traditional film cameras. If you are shooting indoors or in a low-light situation, even with the flash, you should move close enough to the subject for the flash to be effective (no more than 10 feet away). If this is a concern, some digital cameras allow you to use accessory flashes or studio-type lighting.

If you set your digital camera on Auto, the camera will attempt to determine the need for flash based on the lighting conditions, but you still should use the manual setting when appropriate such as using the flash in bright sunlight to reduce intense shadows. In typical indoor situations there will probably not be enough light to take a normal hand-held well-exposed photo. There are many indoor flash photo opportunities you may be faced with. You may want to cast light on a group of people for a portrait photo. You may want to throw light into a room for an architectural photo. Or you may just want to cast light on certain objects in a lighted room that appears too dark for an exposure. If your camera’s auto-exposure settings say that the photo would require a shutter speed slower than 1/60 of a second then you probably shouldn’t hand-hold the camera or the photo would come out blurry. The reason it would come out blurry is because the shutter would be open long enough for any minor hand shake to distort the composition. The use of a tripod or faster film will probably be needed but many of us do not regularly carry a tripod. Most photographers simply use their flash bulb when they are inside.

In order to take effective indoor flash photos there are some techniques you should keep in mind. When using the flash do not point it directly at a mirror or glass that will create a lens flare or just ruin the photo. Stand close enough to your subjects so the flash is actually effective (four to ten feet). Try to make sure your main subjects are about the same distance away from the flash as each other or some that are closer to the flash will appear brighter than ones that are farther away.

Fill flash fills in the areas of a photo that would normally appear too dark. Fill flash can be used for sunny day portraits for shadows on a subject’s face or to fill any shaded area that is out of the sunlight. Fill flash can also be used to cast light into a room where there are no windows. Fill in flash is ideal for back-lit and side-lit situations. In a backlit situation there will be a lot of light in the background but no or little light cast on the front of the subject. This would normally create somewhat of a silhouette effect, but with a fill flash it would balance the photo nicely. But in order for this technique to work, you must be careful to stay in flash range which is usually around four to ten feet. With common cameras in order to add fill flash to a photo just toggle the flash to go off when it normally would not be needed.

Many photographers also choose to bounce the flash off a wall or ceiling to get a softer diffused kind of light commonly sought after for portraits. This kind of flash technique requires a flash that can be aimed in a direction that the camera is not pointed. It takes practice to refine this technique and only a small percentage of photographers actually use it.

Practice using flash in your photos even when it is not necessarily needed and pay attention to your results. The best way to become better at flash photography is to analyze your photos and try to figure out what you could have done differently in order to create a better flash-filled exposure. While flash photography is difficult sometimes, more often, pictures are ruined by shaking.


Learning to use Camera Flash

I hope you will like and benefit from these flash tips for the perfect digital
photography!

You have to take full control of your digital camera's flash. Why? Because digital
cameras and their build-in software are pre-programmed and make a few assumptions..

For example:
There are sensors inside your camera that measure the percentage of illumination in
the scene at which your camera points. If the sensors measure low illumination then
your flash will fire. That is because your camera is pre-programmed with the assumption
that flash will improve the photograph in a low-illumination environment.
On the other hand in a high-illumination environment the flash will not fire because
the camera will assume it's not necessary. After all it's dark out there!

The issue with these assumptions is that there are certain situations when you want
an opposite result..

For example there are times when you want to shoot the perfect digital photography in
a low-illumination environemt without using the flash.. e.g. when you are in a dark
room with a candle burning and no other light sources.. If that's the case you need
to be really steady for the photograph to be sharp. You may want to use a tripod to
achieve better results. If you do it right you will have a perfect digital photography
with beautiful warm orange/red colours.

Remember that the straight light coming from the flash gives a cold commercial look to
your photographs. That could be ok in some cases but not in all cases.. You should
decide whether to use flash, not your camera.

But what happens when working in Bright Light, high-illumination environments?

Then, the flash will not fire! Of course that saves battery-power but what are the
results of your perfect digital photography? You definitely don't want to lose in quality
right?

Imagine when you want to take the perfect digital photography of a person wearing a hat
and the sun is overhead in the sky shining.. Then you will notice that the person's face
will be in dark shadow because of the hat! But even if there's no hat, you will usually
see shadows under the chin or under the person's eyes.. So what you should do is fill
those small shadows with light using your camera's flash!

Again, YOU should decide whether to use flash or not, and not your camera.. YOU should
take control of your camera's flash..

Today's digital cameras have five basic flash settings:

- Setting #1:
Automatic Flash: This is where your camera is pre-programmed to make assumptions
depending on the level of the environment illumination and use the flash accordingly.

- Setting#2:
Automatic Flash with Eye Reduction: Again, the camera uses its software to determine
when the flash will fire but there's also some type of red eye filters to reduce the red
eye effect.

You camera will probably automatically select, by default, one of the above two settings.
I recommend to never use the above settings if you're aiming for the perfect digital
photography.. And why is that you may ask..

As I said before YOU should be the one who decides whether to use flash or not.. And
furthermore the eye reduction filters will not always do a good work and will confuse
your subjects in most cases..

I recommend to make use of the following settings depending on the scene and the subject
you're trying to shoot..

- Setting #3:
Flash Always: With this setting enabled your flash will fire in all cases. You may want to
choose this setting when you want to fill small shadowed areas with light.

- Setting #4:
Flash Disabled: Your flash will not fire no matter how illuminated the environment or the
scene is.. Make use of this setting when you want to shoot in a low-illuminated environment
e.g. a dark room with a candle burning..

Just remember that in a low-illumination environment you have to be really steady in order
to shoot the perfect digital photography
..

- Setting #5:
Slow Shutter Flash: This is a very underestimated setting and the least used.. If you choose
this setting your flash will fire ocassionally but the shutter will remain open for a longer
time than usual. This will allow you to capture the subject illuminated by the flash, but it
will also allow other lighting sources (like a candle's light) to record themselves.

This setting is perfect if there is high illumination on the background while infront of the
subject there's certain darkness. For example when you want to shoot a person in front of a
casino at night.

So.. If you're aiming for the perfect digital photography you should be able to switch between
those five flash settings found in almost all digital cameras these days. Have a look at the
camera's manual for more information on these settings. They are really importand.

Tuesday 3 February 2009

Gambar bini aku

Gambar bini aku masa normal


Snow terburuk sepanjang 20 tahun di UK

Hari ini masuk hari ke3 salji memutih di bumi UK semenjak hari Ahad. Mula2 rasa seronok bila salji turun tapi bila dah tebal rasa benda ni jadi bencana pulak...susah nak jalan sebab jalan licin dan kereta bergerak selaju 5 batu/jam sebab keadaan jalan yg sangat licin.
Difahamkan inilah snow terburuk melanda Uk semenjak 20 tahun lalu dan snow turun sebanyak 8 inci..Banyak pengangkutan seperti Tram, bus dan teksi memberhentikan perkhidmatan lebih awal ( pkl 4 ptg) disebab tidak mahu mengambil risiko utk mengambil penumpang kerana dikhuatiri berlakunya kemalangan dan melibatkan penumpang maka pihak syarikat akan membayar pampasan.Ramai le member yg kerja terpaksa berjalan kaki mengharung snow yg menebal dan licin dan berjalan dlm keadaan terkedek2 dlm 1 jam perjalanan.( nasib baik aku tumbang kawan aku).


Hari Isnin ( hari pertama snow turun)


Walaupun matahari memacar tetapi snow tetap tak cair disebab cuaca masih sejuk.


Hari kedua snow ( selasa)


Ini lah keadaanya snow yg mula cair..agak merbahaya disebabkan ais tu mengeras dan padu yg akan menyebabkan senang tergelincir...
Ada caranya utk mengelakkannya adalah dgn menabur garam (grit) supaya salji terus cair jadi air tanpa mengeras..