DSLR camera settings and tips for taking city landscapes at night
One of the reasons enthusiasts purchase SLR digital cameras, is to take night photographs in and around the city without them resulting in blurred or shaky images. However, as you'll soon find out, it's not as easy as setting your digital camera to automatic and shooting the image. Listed below are tips that will help you take city landscape photographs after dark.
Digital SLR settings for night photography
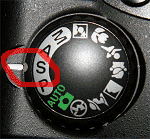
- Set your camera to shutter priority. On a Canon DSLR you turn the top dial to TV. Whereas on some SLR models, like the Nikon D40 for example, shutter priority is displayed as the letter S. If your camera doesn't have TV or S then refer to your camera manual.


- If you have a tripod handy, set the ISO to the lowest setting your camera will go. For example, Canon EOS 400D will go as low as 100 ISO, whereas a Nikon D40 will go to 200. If you don't have a tripod, look for something you can rest your camera on. For example a stone or brick wall.
If you absolutely need to hand hold your camera, the only choice of SLR settings you have for night photography is to set it to P (Program) and up the ISO to 800 - 1600. You can then skip over step 3 below. Note: This usually isn't recommended for high quality night shots.
- For high quality night shots, the shutter needs to be set at a slow speed. This allows the camera enough time to let light in to the sensor, without increasing your ISO setting. How slow depends on the time of night and how dark it is. There is no set shutter speed to suit every situation. However I've found if you take one photograph at 10 seconds, one at 20 and one at 30. Then view the image on your LCD display and see which one shows the most light. From there you will be able to judge how slow the shutter speed needs to be for the rest of your photo's on that particular night.
The mistake many photographers do, is to set their shutter speed too fast. For example the night shot below was taken with a one second shutter. As you can see, this wasn't long enough to allow the light in to the camera's sensor.

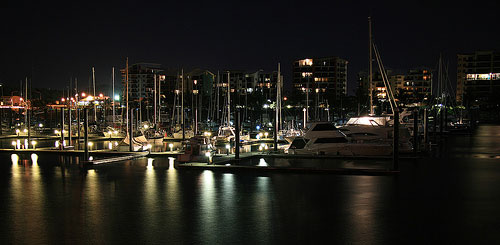
I recognised this instantly and reshot the photograph using a slower shutter speed of 15 seconds. This time the SLR camera was given more time to allow the light in to the sensor, resulting in a clearly focused night shot that you can see below.

Mackay Harbour Marina Australia
Camera: Canon EOS 400D / Rebel XTi
Lens: Canon EF-S17-85mm f/4-5.6 IS USM
Exposure: 15 sec (15)
Aperture: f/5
Focal Length: 33 mm
ISO Speed: 100
Exposure Program: Shutter priority
Flash: Flash did not fireWhy this night shot worked
The shutter speed was set to a slow 15 seconds. Therefore I was able to keep the ISO set to a high quality 100. Of course shooting at such a slow speed also required a sturdy tripod. You won't be able to hand hold a digital camera for 15 seconds without shaking.
If you don't have a tripod handy, the other option is to up the ISO to 800 or 1600, then keep the shutter speed fast. However, the quality of the night shot will be grainy or noisy, and is usually not recommended.
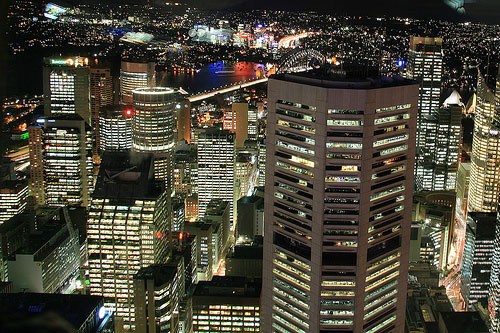
Here is another example of a night photograph, this time the shutter speed is 30 seconds.

Sydney Australia
Camera: Canon EOS 400D / Rebel XTi
Lens: Canon EF-S17-85mm f/4-5.6 IS USM
Exposure: 30 sec (30)
Aperture: f/7.1
Focal Length: 17mm
ISO Speed: 100
Exposure Program: Shutter priority
Flash: Flash did not fireWhy this night shot worked
The ISO was kept to a high image quality 100, while the shutter speed set to a slow 30 seconds. The night photograph was taken from a 260 meter-high Sydney Lookout Tower where tripods were forbidden. Therefore I sat my SLR camera on a binocular stand.
Where to focus for night photography?
A frequently asked question beginners often ask is, where should they focus for night shots. Personally, I get better results if I focus on a far object in the distance. This should ensure your camera automatically sets the aperture to capture the whole scene in focus and not just closer objects.

No comments:
Post a Comment