How to manually change your camera's exposure settings?
Many beginners often find their photographs are either underexposed (too dark) or overexposed (too light or white). However, there is a way to manually change the exposure to compensate for them being darker or lighter. Getting the correct exposure balance isn't as hard as it first seems, once you learn a few simple skills from the tips listed below.
Where is the exposure compensation button?
On both Nikon and Canon digital SLR camera's, the exposure compensation button looks like a plus and minus sign (+/-). On a Nikon D40, this is situated near the shutter button. For Canon 400D it is found upper right to the LCD screen on the back of the camera.
Example of exposure compensation button: ![]()
How to use the exposure compensation button?
- The exposure compensation button can be used when your camera is in any non-automatic mode. For example, you can use it while your top dial is on P (for program), S (Nikon shutter priority), TV (Canon shutter priority), A or AV (aperture priority) and M (fully manual) modes.
- For this exercise, put your camera on the P mode and take one photograph. Now take a second photograph, this time firstly pressing the shutter button half way down to focus (lift up again), then hold down the +/- compensation button, while turning the main dial to the right 4 stops and shoot. Now look at both images one after another in the LCD screen and you should notice a difference in the lighting.
Shown below is an example of what the main dial looks like:
Now repeat this exercise, this time when taking the 2nd photograph, hold down the compensation button down and turn the main dial 4 stops to the left. Note: it won't need to always be 4 stops, this is an example to show extremes only.
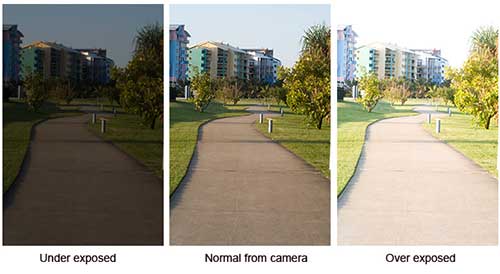
What you should be seeing is a series of photographs, one too dark, one just right and one too light, like the example below:
- If you own a Nikon SLR camera, turning the main dial to the left (while holding down the exposure compensation button) will lighten the image. Whereas turning it to the right will darken the image for the next shot taken. You need to readjust it for each photograph.
If you own a Canon SLR camera, it is the opposite to the Nikon. Turning your main dial to the left (while holding down the exposure compensation button) will darken the image and turning it to the right will lighten the image.
When is exposure compensation useful?
- If at first, you take an image and it looks to be too dark or too light when viewing it in your LCD screen. For example if it is early morning or late evening, you might want the photograph to appear lighter (or darker) than it actually is.
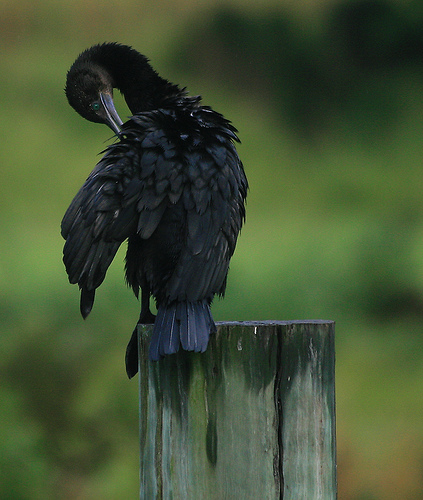
- If you are taking a photograph of an object that is in actual fact too dark, and you want to lighten it. For example if you were taking an image of the underside of a car near the tyre. Bad example I know :) Or lets say you want to photograph a black bird and need to see the actual eye in your image. In this case you could slightly over expose the image to bring out the patterns and shapes.
- In contrast, snow images can appear too over exposed. In these situations it's recommended to underexpose the image until you see a nice balance between the sky and the snow.
- Exposure compensation is also useful for those people that photograph objects in a light tent. A light tent is a square box that has numerous colored backgrounds so photographers can capture products and objects with one background color. For example, if a white background is used and you don't change the exposure compensation, the background may appear off white.
imple green rule for exposing shots taken near nature
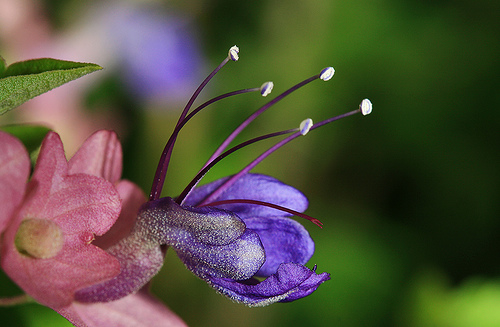
Whenever you take a photograph in or around nature, it's useful to expose on any part of the scene that is green, then underexpose it by two thirds.
For example, for the photograph below, the exposure was taken from the green leaves to the left of the flowers. I then underexposed the shot by 2/3, refocused on the flower and took the shot. As the camera was set on manual, the shutter speed (exposure) stayed as it was when exposed on the green leaves. Usually when you refocus on the subject you want to take a photo of, the camera will tell you the exposure is wrong. Ignore this and take the shot anyway. In most cases, it will result in a nicely exposed, detailed photograph.
If you're not sure what I am referring to by 'setting the exposure', you can find a good article on this at: Advantages of manual settings.
Note, this exposure tip will also work when you have your camera set on shutter priority. However, it won't work for automatic modes (such as landscape, portrait) or aperture priority, as the camera then sets the shutter speed for you.
Exposing Flower Gardens
|
Exposure tip for black subjects like birds
|
Another time this exposure tip was useful, was during an outside photo shoot of my son. The first shot I'd taken was exposed on my son's face. Looking back on the LCD screen, I'd found there was a dark shadow over one side of his face. The shot was taken again, this time exposing (-2/3) on the green grass next to him. This helped to eliminate the shadow on his face.
Related Articles:

No comments:
Post a Comment